
BetterLocale Code
AI-powered localization for Xcode projects
by Christian Drapatz

Localization for Xcode, without file chaos.
BetterLocale Code is your macOS tool for finally getting Xcode localization under control. You can import .xcstrings, .strings, and full .lproj structures, edit everything in one place, and write it back into your project correctly. The core is AI: the app is built to handle translation and ongoing maintenance through AI features, instead of slowing you down with copy-paste, folder chaos, and Xcode’s UI. You can instantly see what’s missing, what’s empty, and where languages drift apart, then fix it deliberately before it blows up in the UI, during QA, or right before release.


Available on the Apple App Store
One click and you’ll see how AI can make your Xcode localization much faster.
Why BetterLocale Code?
Because localization in real projects is never “done once”: text keeps changing, new keys get added, old ones linger, and at some point nobody can say with confidence that everything is still correct. BetterLocale Code turns that into a controlled step in your workflow, with AI as the engine. You translate consistently, fast, and with context, validate consistency, and keep your language data stable, even when migrating between Strings Catalogs and .strings. If you maintain multiple languages seriously, this isn’t a nice-to-have. It saves you release stress, debugging time, and avoidable back-and-forth.

Do you already know the app “BetterLocale Store”?
BetterLocale Apps is another tool for your development workflow. It helps you publish via App Store Connect and makes it easy to maintain your app’s store texts across multiple languages quickly and consistently.
Getting Started
Manual Localization in Xcode: Setup Checklist
If you want to manage localization intentionally yourself (keys, languages, and text), set up your project so Xcode doesn’t “auto-manage” things behind your back.
1) Enable languages in the project (important)
In Xcode, go to Project → Info → Localizations and add every language your app should support (for example, English, German, French).
This is the central place where Xcode knows which language variants exist in your project.
2) Set your String Catalog to “Manually managed”
Open Localizable.xcstrings, select all entries (Cmd+A), and in the right-hand Inspector change Managed from Automatically to Manually.
This keeps you in control: Xcode will stop trying to maintain keys automatically, mark them as “stale,” or clean things up.
3) One clear rule: only keys in code, no UI text
If you want a truly manual workflow, this rule helps a lot:
• In Swift code, reference stable keys only (for example, L10n.loginTitle)
• Keep the actual text only in .xcstrings / .strings
This prevents UI text from ending up hardcoded in your codebase, where it can silently become duplicated or inconsistent over time.
4) Make sure the file is in the correct target
Select Localizable.xcstrings in the Project Navigator and check the right-hand File Inspector:
• Target Membership is enabled (your app target is checked)
If it’s not, your app won’t see those strings at runtime.
5) Use Base Internationalization only if you use Storyboards/XIBs
• SwiftUI / fully programmatic UI: Base Internationalization is usually not needed.
• Storyboards/XIBs: Enable Base Internationalization, then localize UI text through localization files.
6) Localize resources intentionally (if needed)
For things like images, plists, or storyboards:
• Select the file → in the right Inspector under Localization → Localize… → choose languages
Only do this if you truly need language-specific resources.
7) Test languages before you ship
Test directly in Xcode:
• In your Run/Scheme options, change Application Language and Region
You’ll immediately see whether keys are missing, the wrong strings are loaded, or any hardcoded UI text is still showing up.


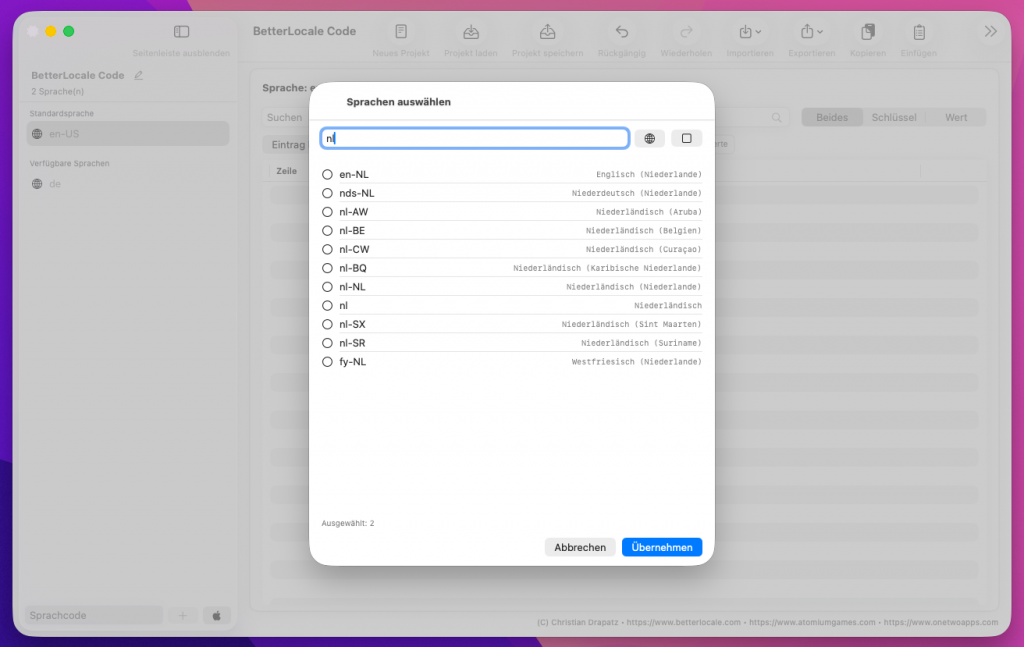
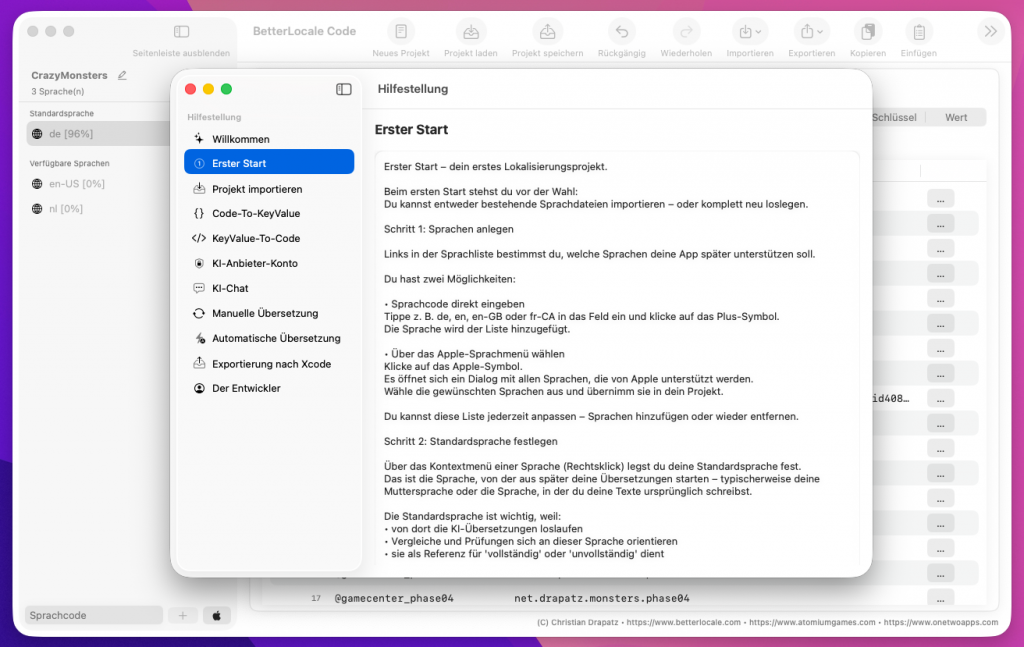
If you’re starting with an empty project, the first step is to set up your language base by choosing which languages your app should support. This selection isn’t permanent. You can adjust it at any time and add or remove languages later as your project evolves.
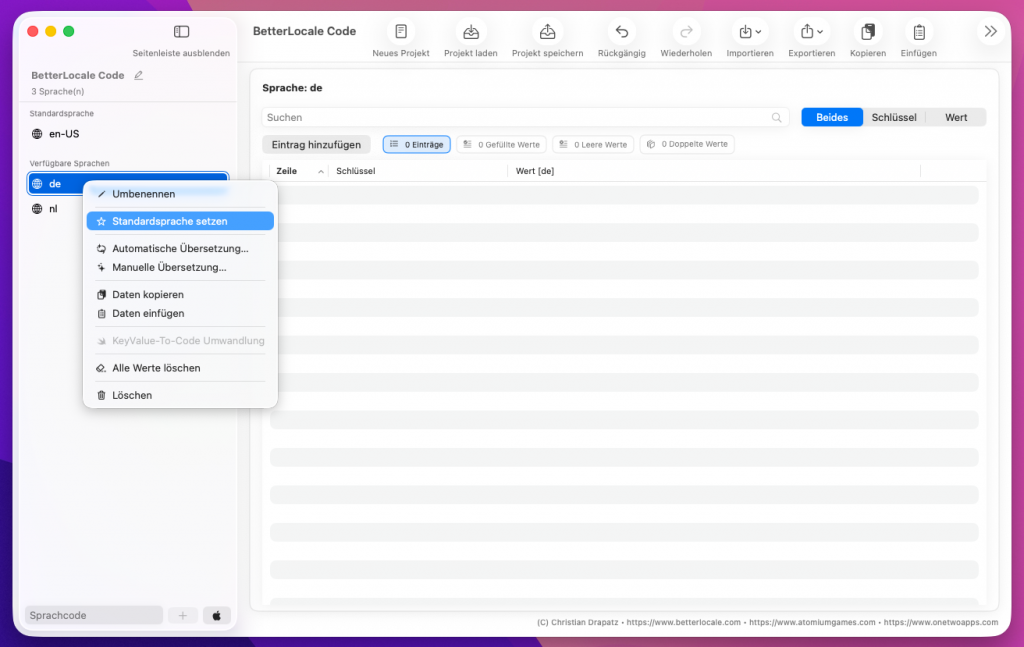
Next, you define the default language. This is your source language, where you maintain the original content and from which translations are derived. BetterLocale Code uses this default language as a reference to create new entries cleanly, reliably detect missing values, and generate translations in a targeted way instead of blindly overwriting everything. This is especially useful during ongoing development, because it keeps a single, clear source of truth for wording and content.
If you’re not starting from scratch, you can import existing localization files. BetterLocale Code can read .strings, .xcstrings, and full .lproj folder structures. Existing keys and values are preserved, so you don’t have to begin with an empty list. From there, you can add languages, fill in missing translations, and fix inconsistencies without hunting through files in Xcode or a text editor.
This way you quickly end up with a clean, consistent localization setup, whether you’re starting fresh or cleaning up and continuing an existing project.
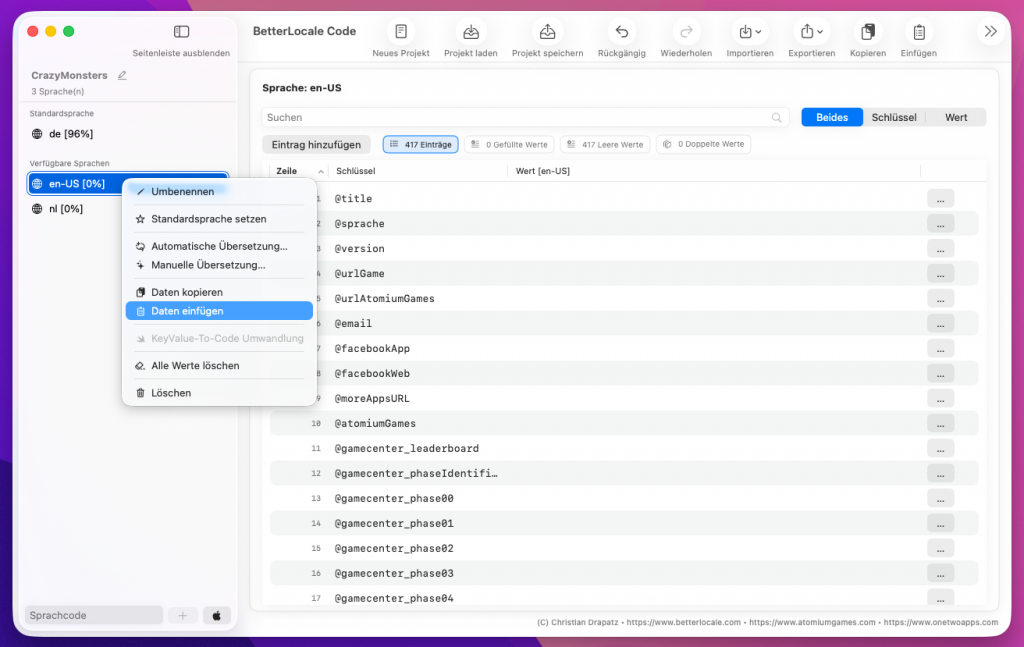
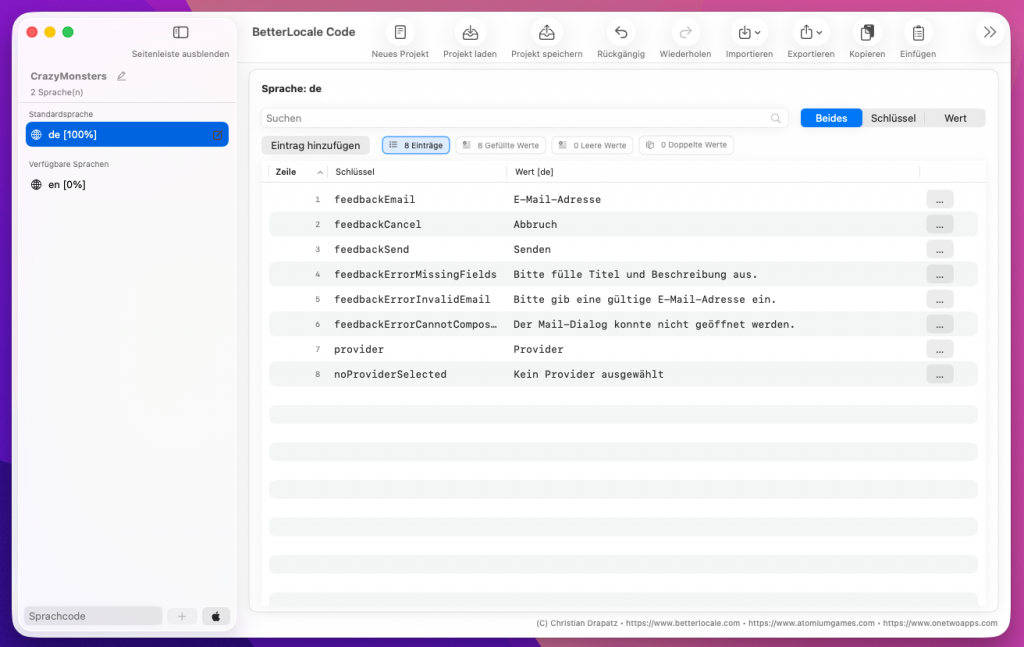
Next, you create your keys and manage them centrally within the project. Existing keys can be edited, renamed, or deleted at any time, depending on what you need.
When you create a new key, BetterLocale Code automatically adds it for all currently enabled languages. The values start out empty, so you only enter translations where you actually need them. This keeps the structure clean and consistent across languages from the beginning and prevents the common issue of a key being missing in one language later on.
You can change both the key name and the per-language values. All updates are applied directly to the project structure, without having to maintain multiple files or folders manually. If you delete a key, it’s removed across all languages, so no outdated entries are left behind in the project.

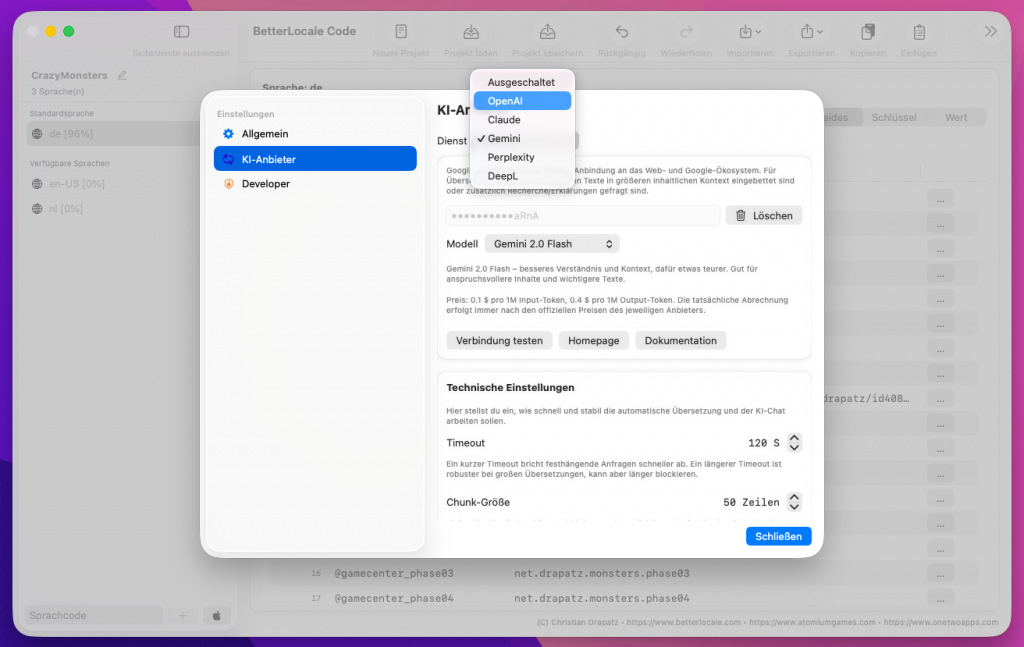
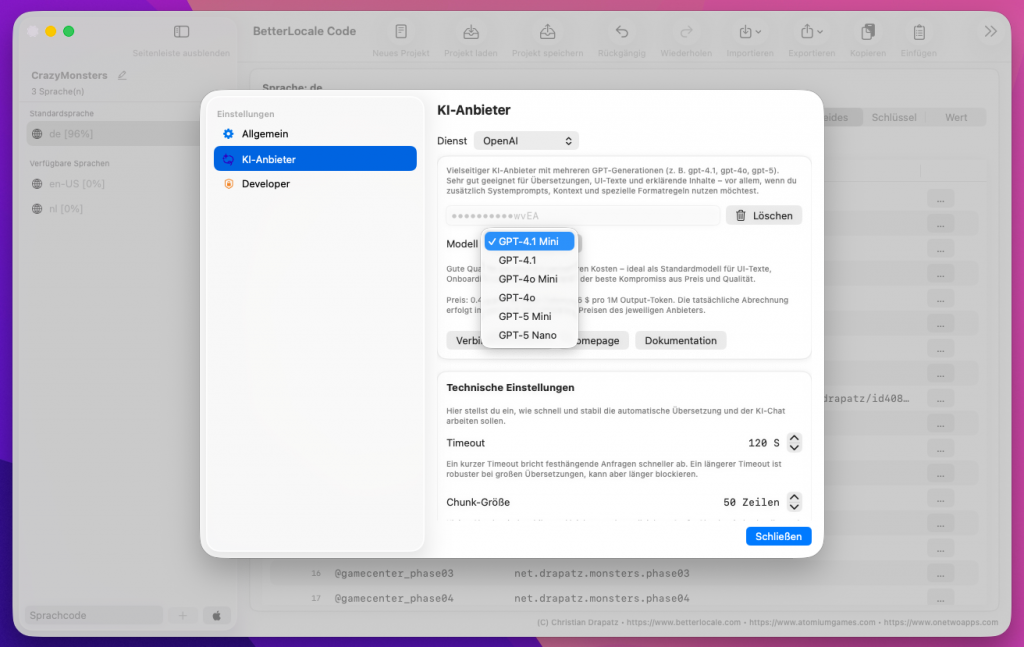
Once your keys and texts are complete in BetterLocale Code, you can generate translations directly through an AI service. The app currently supports OpenAI, Google Gemini, Anthropic Claude und Perplexity AI. You can choose to translate everything or only missing or changed entries, so you don’t spend time or money on content that’s already done.
To use this, you’ll need an account with the provider and an API token. You enter that token in BetterLocale Code under Settings. It is stored only locally on your Mac and is never sent to us. Before you start, it’s worth running a connection test so you can immediately confirm that the token, model selection, and access are set up correctly. If the test fails, the most common causes are an invalid token, missing permissions, an incorrect endpoint, or the fact that no payment method has been added to your provider account yet.
Costs can vary significantly depending on the provider and model, but in many cases they’re far cheaper than traditional translation agencies, especially if you translate updates frequently. Some providers charge per character or “units,” others bill by tokens. With ChatGPT, text is split into tokens, and depending on the language and word length, even a few words can consume multiple tokens. Input and output are billed separately, meaning you pay for both your prompt (including any context) and the generated translation. In practice, more context and longer responses increase usage.
If you want to keep costs low, a few simple habits help: translate only what’s new or empty, provide only the context that’s truly necessary, and start by testing with a small set of entries before running large blocks of text.
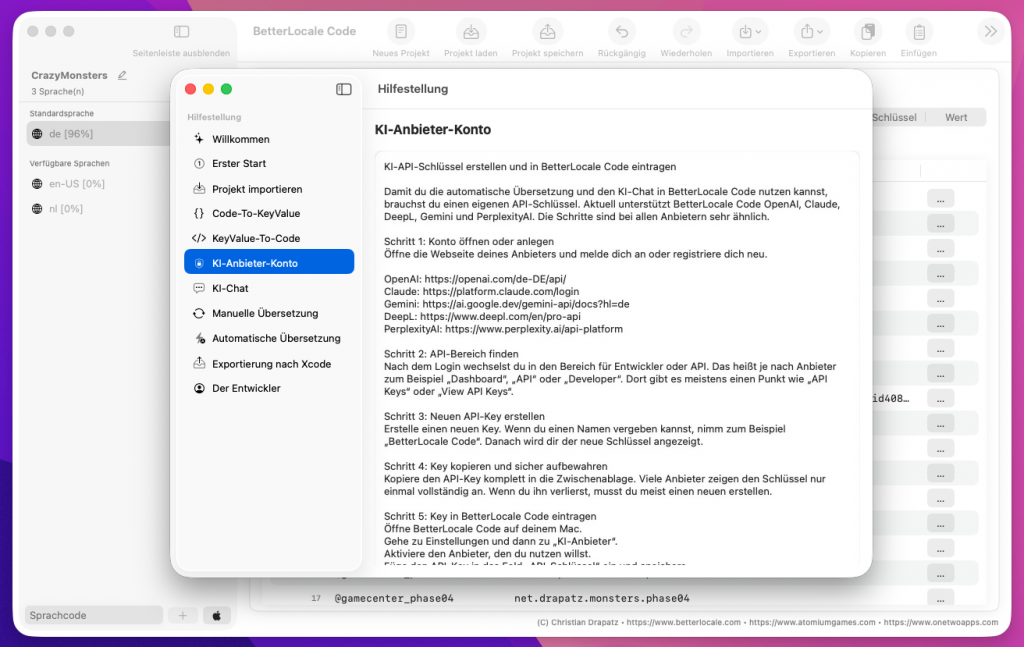
Create an AI API key and enter it in the app
To use automatic translations and the AI chat in the app, you need an API key from an AI provider.
Think of it as a personal access code: the provider can tell the request comes from you and bills usage to your account.
The app currently supports: OpenAI, Google Gemini, Anthropic Claude, Perplexity AI, xAI Grok, and DeepL.
Setup is very similar for all providers.
What you should know first
• API key = access code: You enter it in the app so it can send requests to the provider on your behalf.
• Costs are billed to you: The app sends the requests, but billing happens directly in your provider account.
• Billing is often required: Many providers only allow API requests after a payment method is added. Without billing you may get errors or very small limits.
Quick start: set up in 5 steps
1. Create an account or sign in
Go to your provider’s website and sign in.
2. Create an API key
Look for a section like API, Developer, Dashboard, or API Keys and create a new key there.
3. Copy the key and store it safely
Copy the key immediately and store it securely, ideally in a password manager.
Important: Many providers show the full key only once.
4. Enable billing/payment
Add a payment method or enable billing. Otherwise API requests often won’t work, or will be limited.
5. Enter the key in the app
Open the app → Settings → AI Providers → select a provider → paste the API key → Save
After that you can start translations and use the AI chat.
Provider guides (with direct links)
OpenAI (ChatGPT / OpenAI API)
1. Open the OpenAI dashboard:
https://platform.openai.com/
2. Create an API key:
https://platform.openai.com/settings/organization/api-keys
3. Set up billing/payment method:
https://platform.openai.com/settings/organization/billing/payment-methods
Tip: You often see the full key only once, later only partially.
Claude (Anthropic)
1. Open the Claude console:
https://platform.claude.com/
2. In the console, go to Account Settings and create an API key there.
3. Enable billing in the console so you can use the API.
Note: It previously used console.anthropic.com in some places; it is now moving to platform.claude.com and may redirect.
Gemini (Google)
1. Open Google AI Studio (API keys):
https://aistudio.google.com/app/apikey
2. If you don’t have a project yet, AI Studio often creates a default project automatically. Otherwise select/import a Google Cloud project.
3. Create and copy the API key.
Gemini API key documentation:
https://ai.google.dev/gemini-api/docs/api-key
PerplexityAI
1. Open account/settings:
https://www.perplexity.ai/account
2. In Settings, open the </> API tab and generate a key (“Generate API Key”).
3. Alternatively (depending on the UI), use the API portal:
https://www.perplexity.ai/account/api
Optional: API groups can be useful if you want separate keys (e.g. “Dev” and “Prod”).
xAI Grok
1. Open the xAI account/developer area:
https://x.ai/
2. In the developer/API area, create a new API key and copy it.
3. Enable billing/payment if required so API requests are not blocked.
Note: The exact location of the API key page may change depending on the xAI UI. Search for “API”, “Developers”, or “API Keys”.
DeepL
1. Open DeepL and sign in:
https://www.deepl.com/
2. Go to Account → API Keys & Limits.
3. Click Create key, enter a name, confirm, and copy the key.
DeepL help article:
https://support.deepl.com/hc/en-us/articles/360020695820-API-key-for-DeepL-API
Notes on costs and privacy
• Using AI APIs is usually paid and billed directly to your provider account, typically based on text volume (tokens).
• The app sends only the content you select (e.g. the texts to translate) plus your instruction to the provider.
• Your API key is stored only locally on your Mac in the Keychain and is not shared with third parties.
Security
Treat your API key like a password:
• Do not share it and do not copy it into public repos.
• If you think the key is compromised, disable it in the provider dashboard and create a new one.
• If you use multiple devices or projects, it’s best to use a separate key per device/project so you can revoke access without breaking everything.
BetterLocale Code gives you two ways to translate text. In both cases, you work with context so the translation isn’t done “blind,” but matches your app’s tone, audience, and writing style.
If you already use an external AI tool or prefer to review everything yourself, use the template approach. BetterLocale Code generates a clean translation request from your selected entries in the format “Key” = “Value”;. You can include guidance such as the desired tone (neutral, casual, technical), target audience (developers, end users), product name, UI style (short, menu-like), and rules for placeholders. You then copy this template into the tool of your choice, for example ChatGPT, Gemini, or DeepL. Afterward, you paste the translated lines back into BetterLocale Code. The app detects the keys, maps the values correctly, and updates the corresponding entries automatically. There’s no manual matching and no bouncing between files. This is ideal if you want maximum control and don’t want to rely on an API account.
If you want everything to stay in one workflow, you can translate directly inside BetterLocale Code via API. Here as well, you provide context such as tone, audience, and optional notes to keep translations consistent. Supported providers include OpenAI, Google Gemini, Anthropic Claude and Perplexity AI. You’ll need an API key from the provider you choose, which is used to run and bill the requests. You also decide whether to translate everything or only new, changed, or empty entries. This saves time, reduces copy and paste, and writes results straight into your project data so you can keep working immediately.
BetterLocale Code does not calculate translation costs. Any costs come only from your AI provider and depend on your plan and the amount of text translated. That makes expenses predictable, especially when you translate only changes instead of re-translating everything.
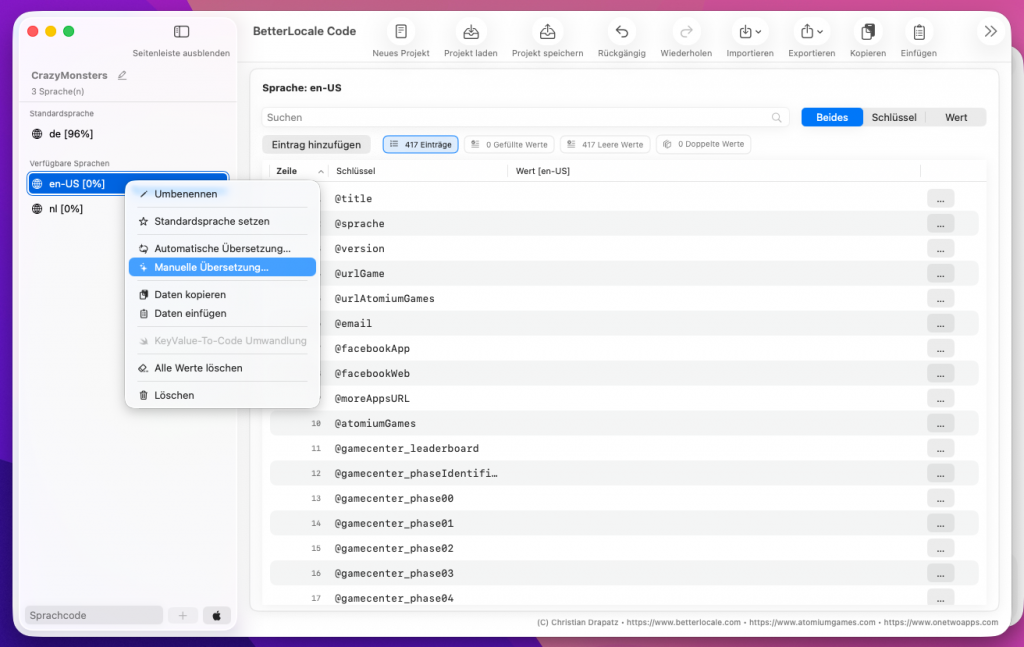
In manual translation, the workflow is almost the same as API translation, except the actual translation step happens outside the app.
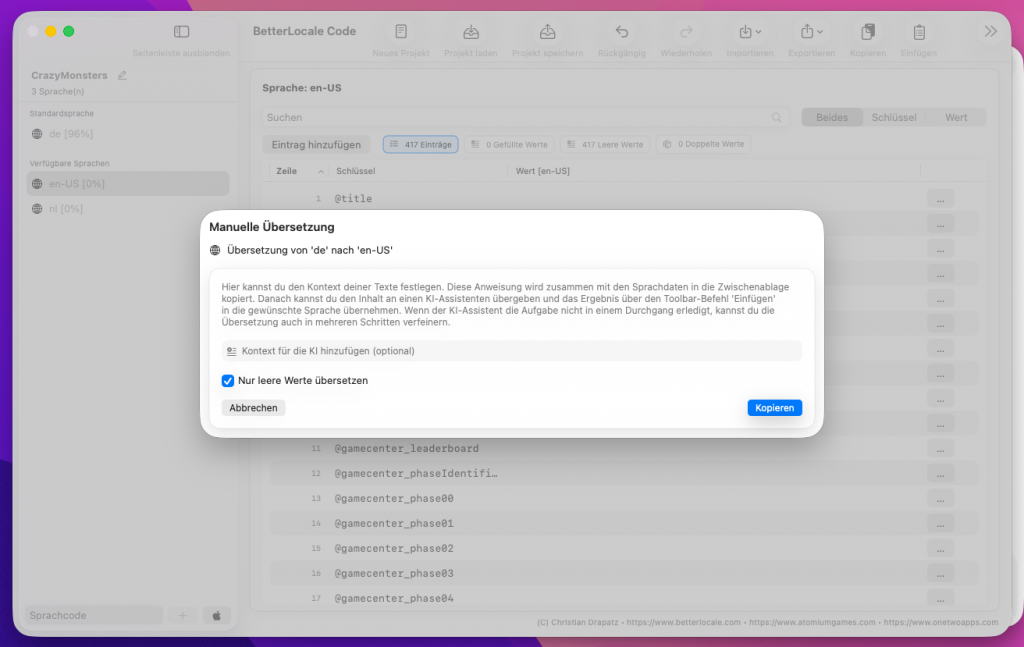
When you start Manual Translate, a dialog opens where you define the scope. You can provide context, such as the desired tone (neutral, casual, formal), target audience, product references, or guidance like “keep UI labels short” or “use informal/formal address.” Next, you choose what should be translated: everything, or only fields that are empty, new, or appear to have changed. This lets you control very precisely how much text is actually sent out.
After you confirm, BetterLocale Code automatically generates a ready-to-use translation prompt including your instructions and a list of the key-value pairs to translate. The prompt is copied straight to the clipboard, so you can paste it into any tool without extra editing.
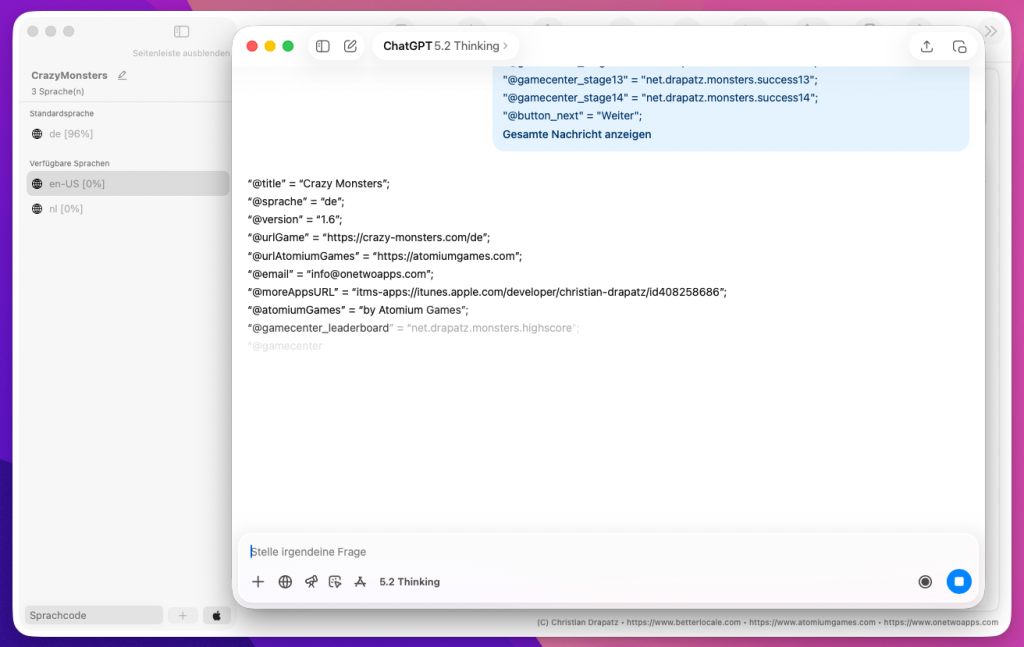
Then you open ChatGPT, DeepL, Gemini, or another translation tool, paste the prompt, and run the translation. The important part is that the result must come back in the format
“Key” = “Value”;
with exactly one entry per line. The keys must not be changed, so BetterLocale Code can match each translation unambiguously.
Afterwards, copy the full result to the clipboard and paste it back into BetterLocale Code. The app parses the lines, matches them against your existing keys, and writes the translated values into the correct languages.
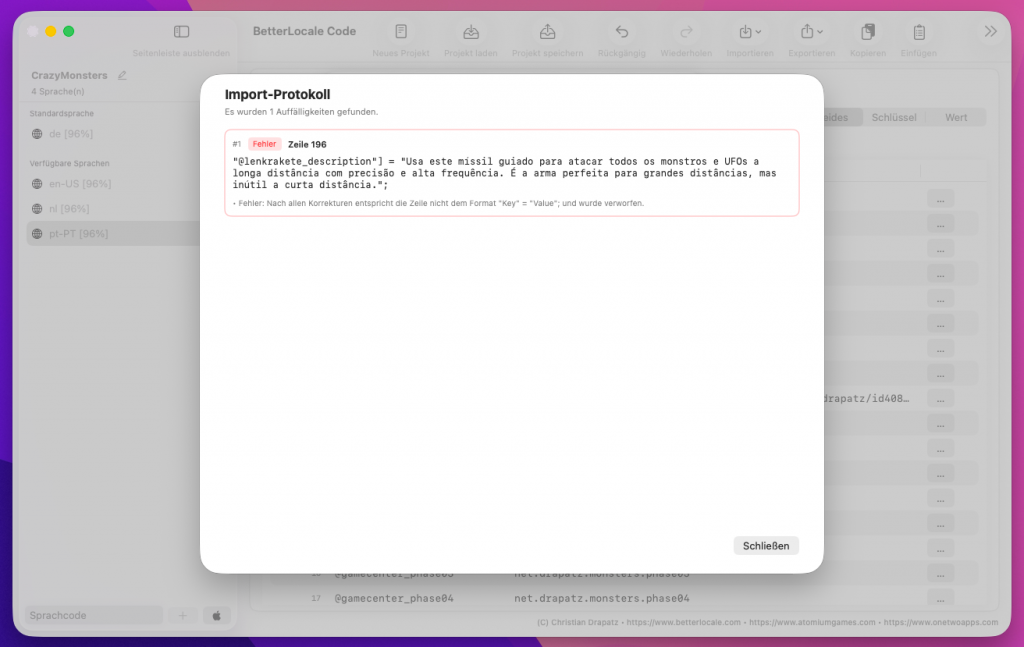
Manual translation usually takes a bit longer, but it’s ideal if you don’t want to connect a paid API service or if you intentionally want to work with different tools. If something is off when you paste the result, such as an invalid format, missing quotes, duplicate keys, or lines that can’t be matched, BetterLocale Code flags the affected entries as errors. That way you immediately see what needs to be fixed and avoid silently importing incorrect data into your project.
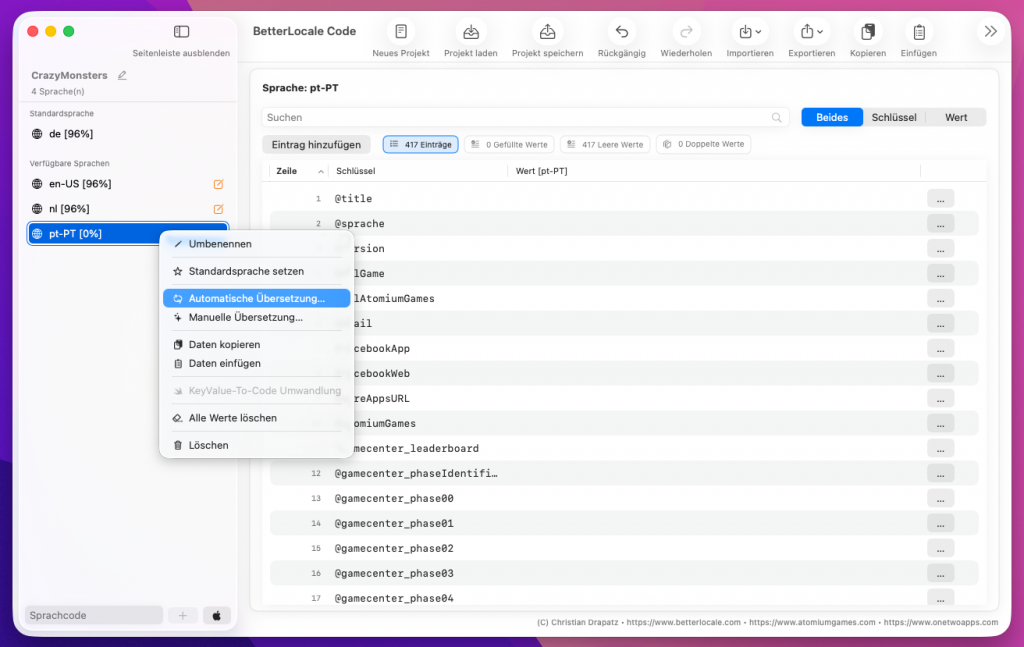
With automatic translation in BetterLocale Code, you have two options depending on how broadly you want to proceed. If you start the translation command from the base language, the app treats it as a full run and translates all selected target languages in one pass. If you run the command from a specific language instead, only that single language is translated, which is ideal when you want to catch up one language or review it in isolation.
After you start, a dialog opens where you can optionally provide additional context for the AI so the translations better match your project. For example, you can choose whether the wording should be more formal or more casual, define the audience you’re writing for, and specify product terms that should remain unchanged. You can also control whether only empty entries should be translated, so existing translations won’t be overwritten. Once you confirm the dialog, BetterLocale Code begins the translation process and works through entries one by one. Mapping is done via the keys, and progress is continuously updated per language.
If something goes wrong during translation, such as missing API permissions, an invalid configuration, network issues, or an unexpected response format, the app doesn’t fail silently. Instead, it collects error messages and shows them together at the end. This lets you quickly see which entries were affected and why, without having to manually trace the entire run.
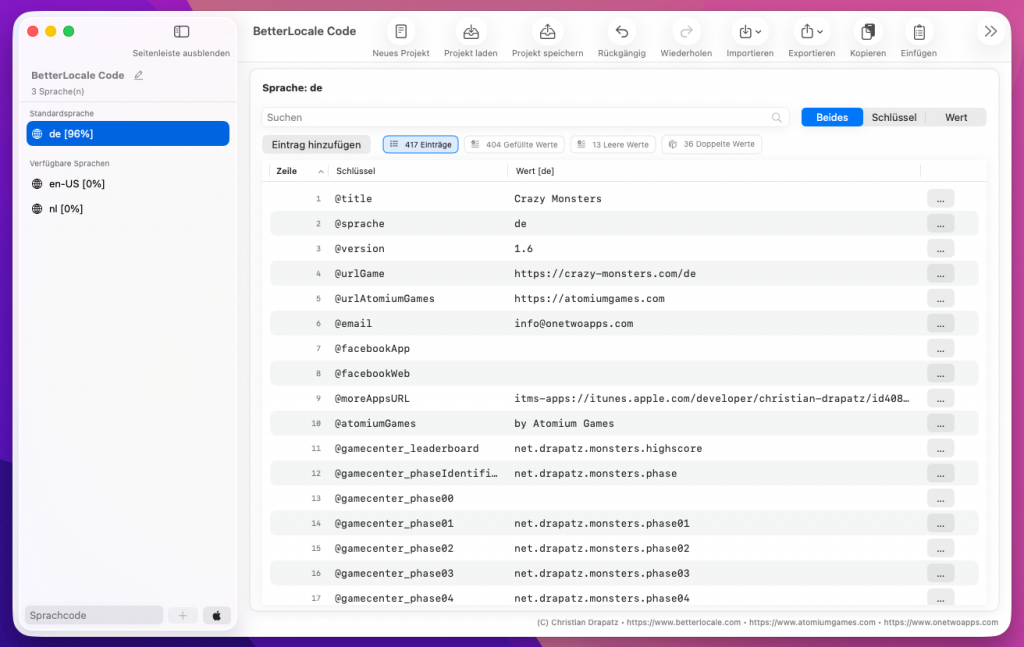
You can tell a language is fully translated when the target language’s percentage matches the base language’s percentage, because both then have the same coverage of filled values. You’ll also see the number of remaining empty fields in the top-left of the table, so you can gauge at a glance whether gaps are still present. You can rerun the process at any time, for example after changes, to fill only newly added or still-missing translations without re-translating everything.
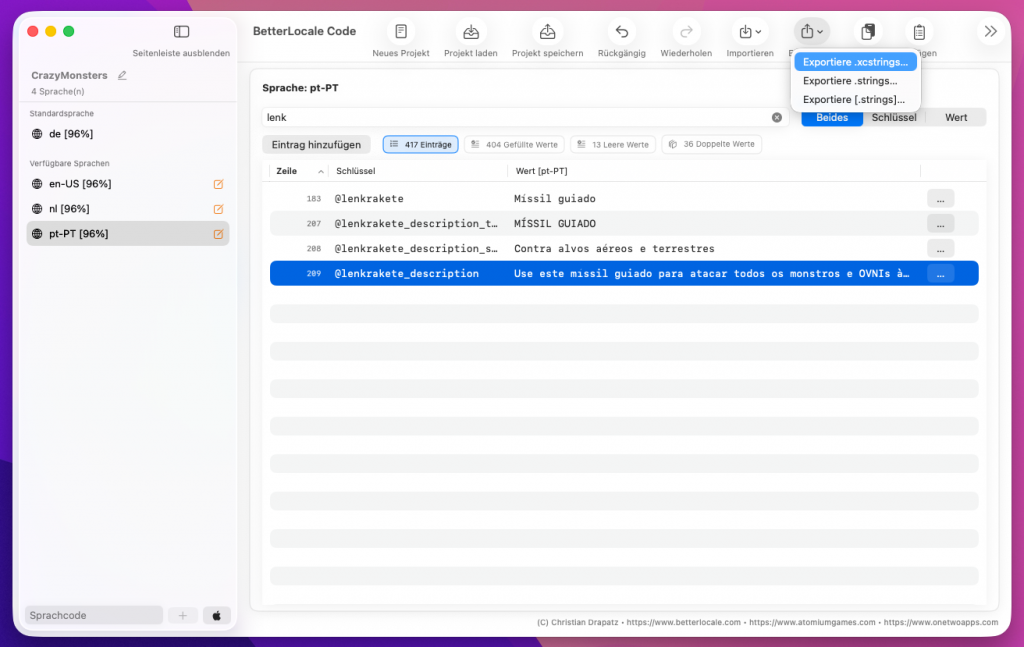
Once you’re done, you can export your localizations from BetterLocale Code straight back into your Xcode project. This puts the edited text exactly where Xcode expects it, including all languages, keys, and values.
Export as XCStrings (Strings Catalog)
If you work with .xcstrings, start by choosing your base language. This is the primary language Xcode uses as the reference for all other translations. Then export the file back to the original location in your project. That way, the existing file is replaced or updated, and Xcode picks up the changes immediately. This is especially handy when you’ve mainly filled in missing values or improved consistency and want to keep the Strings Catalog as the single source of truth in the project.
Export as .strings
If you prefer classic .strings files or you’re maintaining a legacy project, you can convert your data from XCStrings to the .strings format. Entries are written per language in the familiar key–value structure that many existing build setups and tools expect. This is also useful if your workflow is built around .strings, or if you simply don’t want to use Strings Catalogs.
Export as a .lproj folder structure
Alternatively, you can export localizations as separate language folders, using the traditional .lproj directory structure. Each folder contains the corresponding language files (for example, Localizable.strings). This matches Xcode’s classic layout and works well if you intentionally organize your project by language or manage multiple localization files per language.
Result in your project
No matter which export option you choose, your localization files end up in a format Xcode understands immediately. From there, you can test right away by switching the language on the simulator or device and verifying that all strings show up correctly.
Additional Features
BetterLocale Code includes a built-in tutorial that guides you through the core features in a structured way, so you don’t have to read documentation first or learn by trial and error. It’s designed to walk you through a complete, real-world workflow and highlight the exact spots where people typically lose the most time.
You’ll move step by step through the process, from creating a project to importing your existing localizations (for example, Localizable.xcstrings, classic .strings files, or entire .lproj folders) and exporting everything cleanly back into your Xcode project. Along the way, the tutorial shows how to add languages, import existing language sets, and maintain your keys and values efficiently, including editing, search, and consistency checks.
A major focus is quality and completeness. The tutorial explains how to quickly spot missing translations, empty values, and inconsistencies, compare languages side by side, and organize your strings so they stay consistent across all targets. You’ll also get guidance on avoiding common pitfalls like duplicate keys, inconsistent placeholders, or accidentally modified format strings.
AI translation is covered in a practical, hands-on way. You’ll learn both approaches: the manual route using a generated template (copy into an AI tool like ChatGPT, then paste the result back into the app) and direct in-app translation via API. It’s not just about clicking “Translate” but about providing useful context, tone, and audience, and choosing whether to translate everything or only new and changed entries.
For day-to-day work, you can restart the tutorial at any time, skip steps, and use it as a quick refresher, for example after updates or when you haven’t used a feature in a while. That way, onboarding isn’t a one-time thing. It also helps you stay confident when using newer or less frequently used parts of the app.
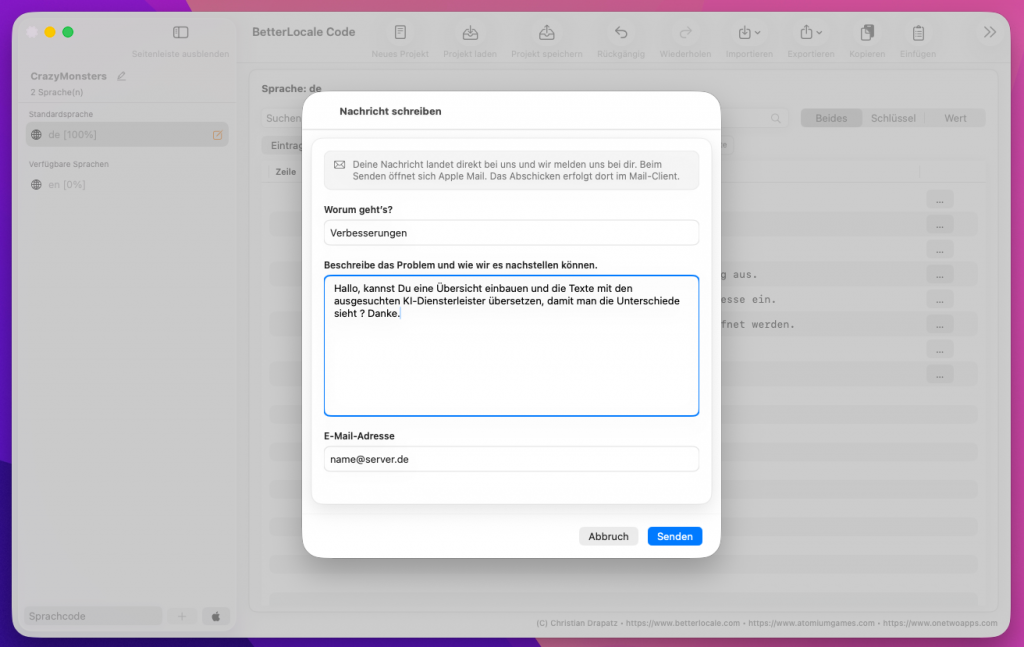
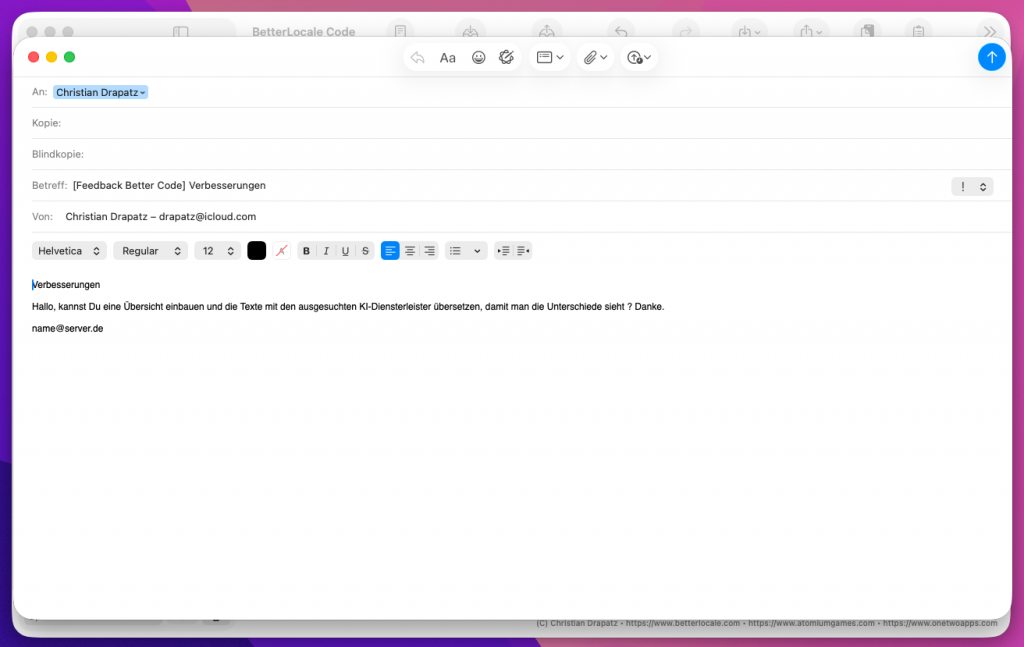
In BetterLocale Code, you can send feedback directly from within the app without having to hunt for a contact address or gather details first.
When you choose the feedback command, BetterLocale Code opens your default email client and creates a new message with a prefilled subject line. That way your request is automatically categorized, and you can start writing right away.
This is especially useful if you have a question about a feature or a recommended workflow, want to submit a feature request, or need to report a bug. If you’re reporting an issue, it really helps if you briefly describe what you were trying to do, what actually happened, and what you expected instead. If possible, include a screenshot and mention which file type you were working with (.xcstrings, .strings, or .lproj).
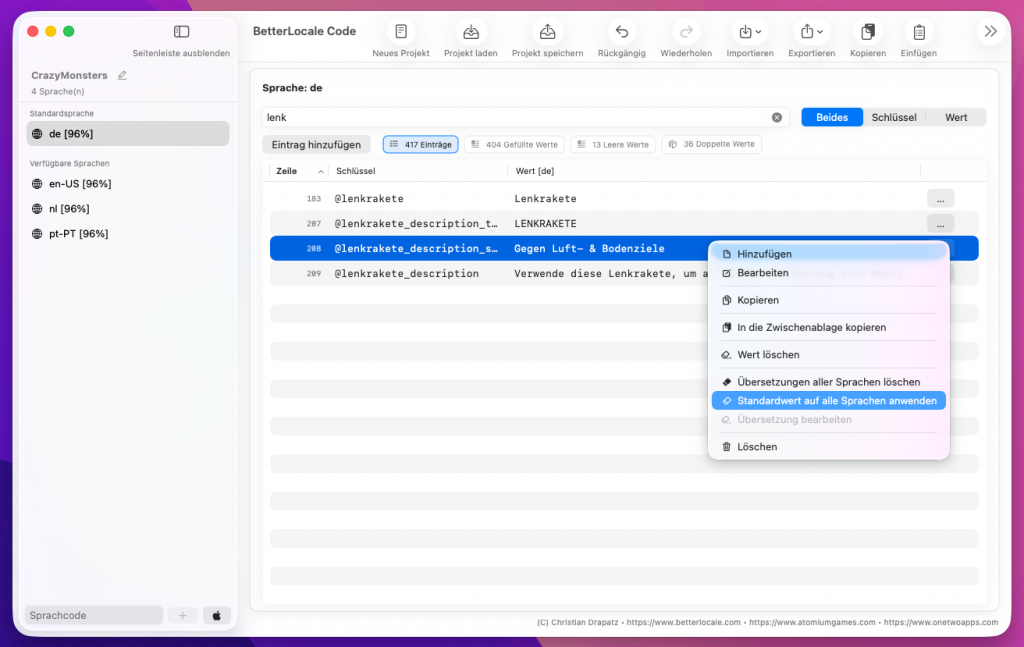
When you change text in the base language, it’s often more than a simple typo fix. Meaning, tone, or context can shift and that can make existing translations in other languages inaccurate or simply outdated. That’s why BetterLocale Code gives you two clean options: you can intentionally reset translations after a change and recreate them, or you can apply the same base value across all languages.
If you update a value in the base language, it can be a good idea to clear the translations in the other languages so nothing stays wrong without anyone noticing. BetterLocale Code supports this in two ways: for meaningful edits, you’ll see a prompt asking whether the existing translations should be removed. And you can trigger the same cleanup manually anytime: switch to the base language in the language list, select the entry, and use the command “Delete translations for all languages.” The key remains unchanged, only the values in the other languages are cleared. This is handy because you immediately see what needs re-translation and because outdated translations don’t quietly linger in your project.
Typical cases include revised UI copy (tone, length, clarity), functional content changes (for example updated conditions or new features), or changes to placeholders and sentence structure where you explicitly want fresh translations.
Sometimes you want the exact opposite: a text should intentionally be identical across all languages. This often applies to content you don’t translate, such as URLs, brand or product names, model identifiers, or technical terms you want to keep consistent. In that case, use “Apply base value to all languages.” The app takes the value from the base language and writes it into every existing language. It saves time and keeps the content consistent everywhere.
For day-to-day work, there are also two commands that are constantly useful for maintenance and cleanup: “Copy to Clipboard,” which lets you copy entries individually or in bulk depending on context (for example for review or for an AI tool), and “Delete key including all values,” which removes an entry completely from the project, meaning the key and every language value. This is useful when a string is no longer used and you want to keep your project clean.

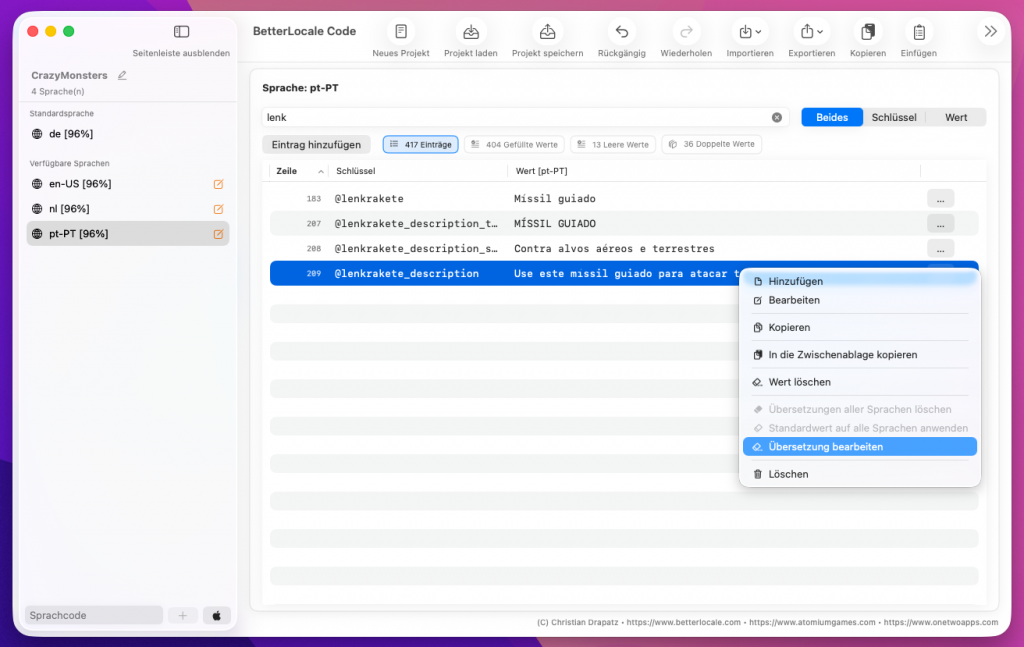
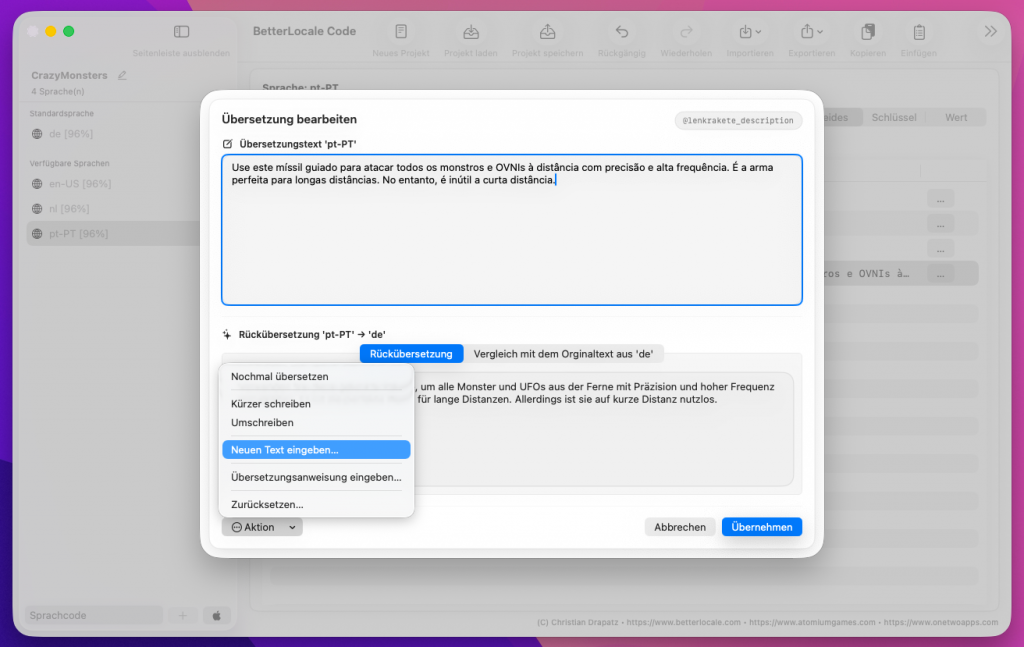
Once translations are available, it’s worth doing a quick spot check. Select an entry in the list and open the detail dialog via the context menu or the Edit Translations button. There you can review translations quickly and correct them immediately if needed.
The dialog shows three items stacked vertically: the translation in the currently selected language, a back-translation into the default language, and the original text in the default language. The back-translation is a handy sanity check. If it differs noticeably from the original in meaning, that’s often a sign the translation reads well but doesn’t capture the intent accurately.
This lets you review and “check off” entries efficiently or make targeted improvements without having to read large blocks of text every time. Especially with AI-generated translations, this dialog helps you squeeze out the last bit of quality and catch common issues early. It also includes actions that let you refine and adjust text directly within the dialog.
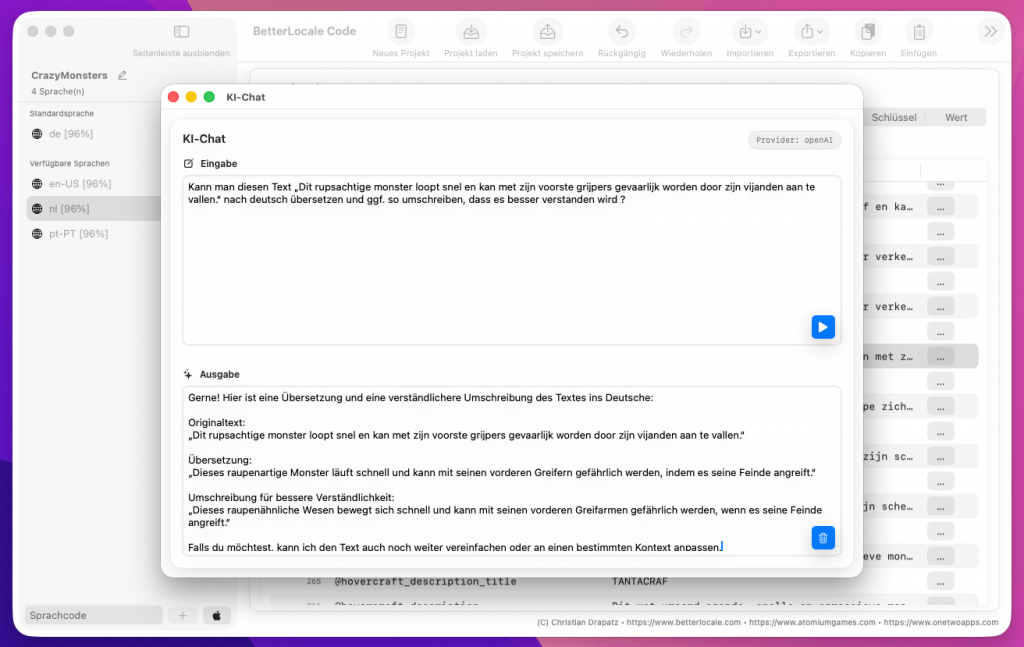
BetterLocale Code also includes an integrated AI chat that works like a classic chat assistant. You can ask questions directly inside the app and get help while you work, for example polishing wording (App Store text, UI strings, error messages), reviewing translations for tone and consistency, suggesting sensible key names and structures, or generating short explanations and variants without losing context.
Technically, the chat uses the same AI APIs as the translation features. That means the provider you’ve configured in BetterLocale Code (for example OpenAI, DeepL, Gemini, Claude, or Perplexity) is also used for chat. You get one consistent setup with the same credentials and the same rules.
Billing always goes through the respective provider and its pricing model. With token-based pricing, it’s important to know that input (the text you send) and output (the model’s response) are usually billed separately. Tokens are not words. As a rough rule of thumb, you can often estimate about 1 token ≈ 4 characters or roughly 0.75 words, but this can vary noticeably depending on language and content.
Just for orientation: In the OpenAI API, GPT-4.1 is priced at USD 2.00 per 1 million input tokens and USD 8.00 per 1 million output tokens, and GPT-4.1 mini at USD 0.40 (input) and USD 1.60 (output). Other providers and models may differ.
If you want to keep costs low, it usually helps to ask short, clear questions, only send the text that actually needs review (instead of entire files), use a smaller model for quick checks, and switch to a larger model only for sensitive or high-impact text.

The “Swift → KeyValue” feature helps you turn existing text definitions from your Swift code into a clean key-value format, so you can reuse them directly in BetterLocale Code.
Important: the app does not automatically scan Swift files in your project. You manually paste the relevant Swift code, or just specific snippets, into the input field. That’s intentional: you stay in control of what gets analyzed, and BetterLocale Code doesn’t need access to your project.
From the pasted content, the feature detects string constants where there is a stable mapping between a name and a string value. It then generates lines in the format „Key“ = „Value“;, which you can use as a foundation for your localization workflow, for example with .strings or .xcstrings. Typical sources include static let definitions, constants inside structs or enums, and centrally maintained text collections in containers such as Strings, L10n, Text, Copy, or similar.
It works best when the key and value clearly belong together, for example static let title = „Settings“. With string literals scattered throughout the code, like Text(„Settings“) or label.text = „Settings“, there’s usually no stable key that you’ll need later for localization. At that point the key would have to be guessed or inferred from context, which quickly leads to duplicate or conflicting keys, poor key names, and an inconsistent structure.
If you want reliable results, define your texts up front as constants or clearly named properties, such as static let settingsTitle = „…“, static let errorNetwork = „…“, or static let buttonSave = „…“. That way, BetterLocale Code can use the constant names as keys, output the string values cleanly as values, and produce a consistent key structure that stays easy to maintain.
If your code currently contains a lot of direct string literals, a good intermediate step is to move the most important texts into a central L10n or Strings structure first, and then run “Swift → KeyValue” to generate your localization base from there.

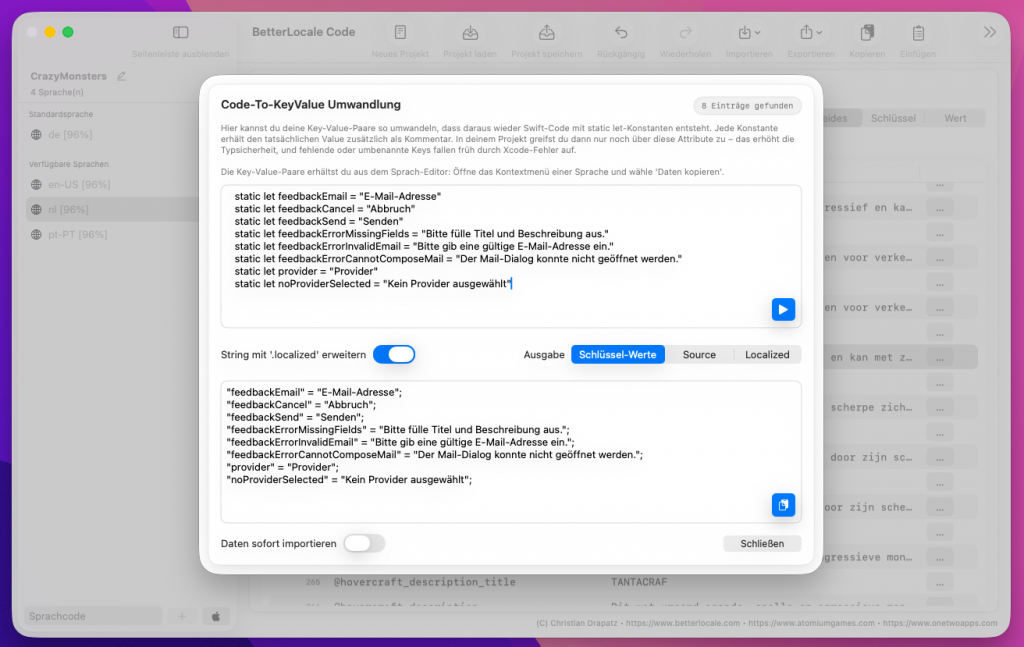
The “KeyValue to Code” feature regenerates clean Swift code from existing key-value entries, using a structured constants layout. This is especially useful if a project originally started with hardcoded UI strings in code, for example static let ok = „OK“ or static let loginTitle = „Sign In“.
When you later move to proper localization, you often want to keep that familiar structure in your code, just without the fixed text. Instead, the code should reference localization keys only. That’s exactly what “KeyValue to Code” does: BetterLocale Code generates the properties again and replaces the old string literals with the matching keys you maintain in your .strings or .xcstrings files.
Important: the app does not automatically scan Swift files in your project for this. You paste the relevant code snippet or a list of keys into the input field manually. This is intentional, so the feature stays fast, you keep full control, and no project-wide analysis is required.
Typical use cases include migrating from hardcoded strings to key-based localization with minimal manual effort, cleaning up and standardizing legacy constants files, and refactors where you build a clear “Strings” API, grouped by screens or features. It also makes code reviews easier, because UI text no longer lives in Swift files. The code stays stable with durable keys, while the actual wording changes only in your localization files.
Bottom line: you end up with a robust, maintainable setup. Your Swift code stays clean and consistent, and the real text lives centrally in your localization files, where you can translate it, review it, and version it properly.

Have you tried OneTwoApps’ iPhone and iPad apps yet?

ScanBox

My BudgetBook

My BudgetBook Pro
Pricing / Premium
We offer BetterLocale Code as a subscription so we can maintain it long-term, keep improving it, and run it reliably. Your subscription supports ongoing work on new features, day-to-day refinements, bug fixes, and regular updates.
A key focus is expanding the AI integration. Over time, we’re adding support for more providers so you’ll have more choice and smoother workflows in the future. That means you’re not just buying what’s available today. While your subscription is active, you automatically receive all updates and new features.
The subscription includes the full feature set. You subscribe directly in the app, and you can cancel anytime through the App Store. You can also open the relevant App Store subscription management page right from within the app.
Full Access (1 Month)
All features unlocked for 1 month.
That’s €3.99 per month.
Full Access (2 Months)
All features unlocked for 2 months.
That’s about €3.5 per month.
Full Access (3 Months)
All features unlocked for 3 months.
That’s about €3.3 per month.
Full Access (6 Months)
All features unlocked for 6 months.
That’s about €2.8 per month.
Full Access (12 Months)
All features unlocked for 12 months.
That’s about €2.1 per month.
App Privacy
BetterLocale Code stores projects and language data exclusively on your Mac. Data is only sent externally if you choose to use optional AI features (for example, translation or chat). In that case, only the content you selected, together with the specific request, is sent to the AI provider you chose. API keys are stored locally in the macOS Keychain only.
For more details, please see the full Privacy Policy.
Have you checked out AtomiumGames’ games yet?


Crazy Monsters

Tower Arena: Time for heroes

Strategy War: Battle Game

Battle Alliance: Tower Defense
FAQ
Here you’ll find the most important questions about BetterLocale Code, along with a few practical day-to-day tips and tricks to help you get clean translations faster and export back into your Xcode project without the usual hassle.
What is BetterLocale Code, and what do I use it for?
BetterLocale Code is a macOS tool for maintaining and organizing localization in Xcode projects. It’s built for developers who want to edit language resources in a structured way, without constantly jumping between Xcode, the file system, and text editors, or manually working inside .xcstrings, .strings, and .lproj folders.
You import your existing localization files into a central editor, update keys and values per language in a clear view, and immediately see where translations are missing or out of date. This is especially helpful when copy changes frequently, new keys are added, or multiple languages need to be maintained in parallel and you want to ensure everything stays consistent.
Typical workflows in BetterLocale Code include adding new languages, creating and organizing keys, updating values, finding and closing gaps in missing entries, and generating translations either manually using a prepared template or directly through an AI provider via API. Afterward, you export the updated content back into your Xcode project so your app’s localization is clean, complete, and in sync with your current project state.
Which file formats and project structures are supported?
BetterLocale Code supports the common localization formats in Apple’s ecosystem and can handle both modern and classic project setups.
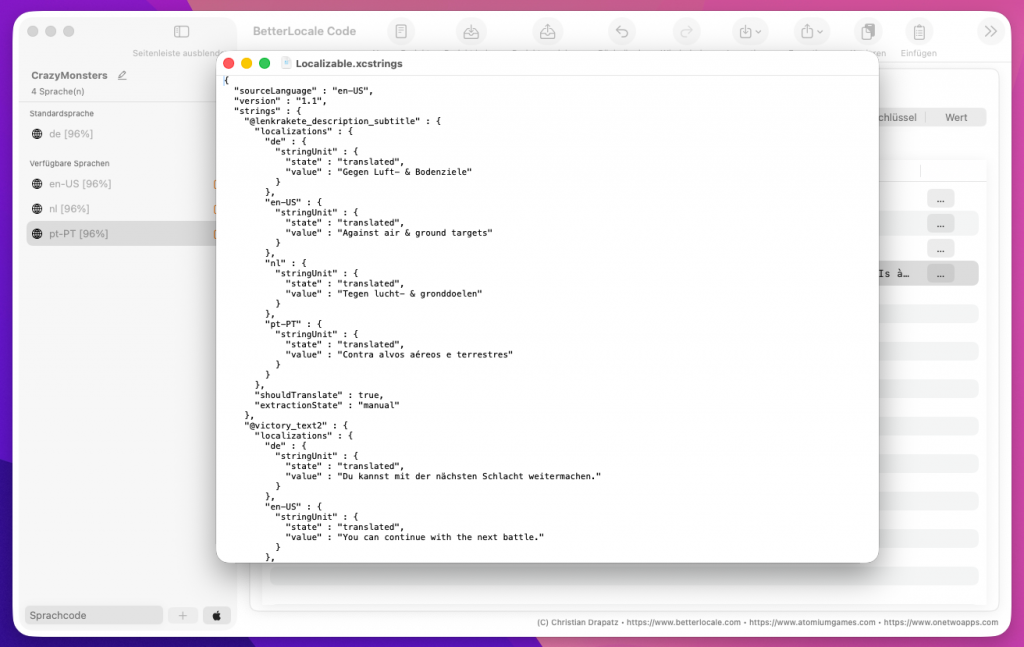
a) String Catalogs (.xcstrings)
You can import and edit String Catalogs such as Localizable.xcstrings. This is Xcode’s modern format, where strings are managed centrally in a single catalog.
b) Classic .strings files
Classic files like Localizable.strings (and other .strings files, for example per screen or module) are supported as well. You can maintain the content as usual, detect missing translations, and fill in values selectively.
c) Language folder structure (*.lproj)
You can also import complete language folders such as de.lproj, en.lproj, or fr.lproj. This covers typical Xcode project structures, including the localization files inside those folders.
Import, editing, and conversion
You can import content from these formats, edit everything in one place, and convert between formats when needed. This is especially helpful if you:
a) want to migrate from .strings to .xcstrings (or the other way around),
b) inherited projects where formats are mixed, or
c) need to merge localizations from different sources.
This keeps your project flexible: you can use the structure that best fits your team and build process, without manually copying localization content back and forth.
What does a typical workflow look like in the app?
In practice, the flow is straightforward and mirrors how localization actually works in Xcode. A typical workflow looks like this:
a) Import your existing localizations
You start by importing the files you already have: .xcstrings, classic .strings, or entire .lproj folders. BetterLocale Code reads the structure and creates a project you can work on centrally, without clicking through folders and individual files.
b) Maintain and correct content
Next, you review keys and values: Are strings outdated? Are placeholders missing? Any typos? Does the wording still fit? You can add new keys, update existing entries, and clean up content. After feature changes, this is usually the most time-consuming part when done directly in Xcode.
c) Quality check and completeness
Then you specifically look for issues: missing translations, empty fields, incomplete language variants, or entries that no longer match the base language. The idea is to surface gaps and inconsistencies early, instead of finding them during testing or right before release.
d) Translation (manual or via API)
You have two options for translation:
Manual via template: BetterLocale Code generates a clean translation prompt that you paste into an external tool (for example ChatGPT). You copy the result back, and the app maps values to the correct keys.
Direct via API: You translate inside the app using a connected provider via API, optionally including context like tone and target audience. You can also choose whether to translate everything or only missing/changed entries.
e) Export back to your Xcode project
Once everything looks good, you export the data back into your project, ideally to the original location. This gives you a clean .xcstrings or .lproj structure in your repo again, without manually merging or copying files.
Goal of the workflow
You end up with a consistent, complete set of localization data and reduce the risk of shipping a release with missing strings, broken placeholders, or languages drifting out of sync.
How do I find missing or incomplete translations?
BetterLocale Code helps you in several places so you don’t have to manually scroll through every entry:
a) Per-language completeness (percentage indicator)
For each language, the app shows a progress percentage. The baseline is your default language: as soon as an entry exists there, the app expects a corresponding value for every target language. This makes it easy to spot which language is overall “behind” and where it’s most worth catching up first.
b) Empty-entry counter
You also get a clear count of how many fields are still empty in a given language. This is especially useful when you maintain lots of strings or add text regularly. You can immediately see whether everything is filled in or whether gaps remain.
c) Work on open items with focus
You can focus on what matters by editing or translating only specific states, for example:
-
only empty entries (common when you’ve added new languages)
-
only changed entries (common after updates in the default language, when translations may be outdated)
The practical benefit: you get a clear to-do list, instantly see what’s blocking progress, and can close gaps systematically without clicking through hundreds of entries.
What happens if I change a text in the base language?
When you update a string in the base language, that becomes the new source for all translations. In many cases, existing translations no longer match, because they were written for the previous source text. To prevent you from accidentally shipping outdated translations, BetterLocale Code helps you handle the affected language versions in a clean, controlled way.
You have a few options:
a) Automatically on change
When a base string changes, the app will typically notify you and offer to discard the existing translations. This is useful if you want to ensure your project only contains translations that actually match the current source text.
b) Manually at any time
You can also trigger this yourself: select the entry in the base language and use the command “Delete translations for all languages.” This removes the translations for that key, so you can re-translate properly afterward, either using AI or manually.
c) Same value in all languages
Sometimes a value should be identical across all languages, for example URLs, product names, brand names, short codes, or terms you intentionally keep unchanged. In that case, use “Apply base value to all languages.” The app will copy the base text 1:1 into every language variant.
This is especially helpful when you want a clear distinction between “needs re-translation” and “should intentionally stay the same everywhere,” so your project stays consistent.
How does automatic translation work in the app?
Automatic translation runs directly inside BetterLocale Code. Depending on what you need, you can translate either all languages or just a single language.
You have two options:
a) All languages in one run
If you start the translation command from the base language, BetterLocale Code processes each selected target language one after another. This is ideal when you’re setting up a new project or want to roll out larger changes across all languages in one pass.
b) One specific language only
If you only want to update one language, run the translation command while you’re in that target language. This lets you fine-tune a single locale without touching the other language versions.
Before the run starts, a dialog opens where you can optionally provide context, such as the desired tone, target audience, or wording notes. You can also choose to translate only empty fields, which is useful if you don’t want to overwrite existing text and only want to fill in missing entries.
After the run, you’ll get a summary of what was translated and which fields were updated. If any errors occur, they’re collected and shown at the end, including details. That way the process doesn’t stop mid-run, and you can fix issues afterward in a targeted way.
What’s the difference between automatic and manual AI translation?
Both options lead to the same result: you get clean translations per language, can review and refine them in BetterLocale Code, and then transfer them to App Store Connect manually. The main difference is how the translation is generated and how it gets back into the app.
Automatic translation (in-app via API)
With automatic translation, BetterLocale Code connects directly to an AI provider.
•Setup: Add your API key in Settings, choose the provider, and optionally select a model.
•Workflow: Start the translation right inside the app. You can also provide context, such as tone, target audience, or brand guidelines.
•Scope: Choose whether to translate everything or only empty and changed fields.
•Benefits: Fast workflow, no copy/paste, easy to track changes, especially useful with many languages or frequent updates.
•Cost note: Billing happens directly through the AI provider, based on the amount of text processed.
Manual translation (template for ChatGPT and similar tools)
With manual translation, BetterLocale Code prepares everything, but you use an external tool to do the translation.
•Preparation: The app generates a ready-to-use translation prompt (including context) and copies it to your clipboard.
•Workflow: Paste the prompt into the tool of your choice (for example ChatGPT, Gemini, or DeepL). The result is a list in the format „Key“ = „Value“;.
•Re-import: Copy that output back into BetterLocale Code. The app recognizes the structure, maps values to the correct fields automatically, and applies the translations.
•Benefits: No API setup required, great for getting started or if you prefer not to connect directly. You’re also free to use whichever tool you like.
•Trade-off: A bit more manual work and usually slower than the API approach.
If you translate a lot and on a regular basis, API translation is typically the faster default. For occasional translations or as a first step, the manual template is often the easiest way to start.
Which AI providers are supported, and what do I need?
Depending on your configuration, BetterLocale Code supports multiple AI providers, including OpenAI, Google Gemini, Anthropic Claude and Perplexity AI. You can choose the service that fits you best based on pricing, output quality, or language characteristics.
There are two ways to use AI translation:
a) Manual (no direct integration)
In the app, you generate a translation template, translate it using any external tool you prefer, and then paste the result back into BetterLocale Code. No API key is required inside the app.
b) Direct via API (translate inside the app)
If you want to run translations directly in BetterLocale Code, you’ll need the following from the provider you choose:
•an account
•an API key or token (name varies by provider)
You enter the API key in BetterLocale Code, then run a connection test to confirm your setup is correct and requests go through successfully.
Billing matters: All costs are charged by the selected AI provider, not by BetterLocale Code. Providers typically bill based on usage, depending on text volume and the model you use. That means you stay in control of how much automation you use and which models you run.
What does “token” mean, and how do costs work with ChatGPT and similar services?
Many AI providers charge based on usage, measured in tokens. Tokens are small units of text, usually parts of words. Short words often map to a single token, while longer words may be split into multiple tokens. In most pricing models, input (your prompt/source text) and output (the response/translation) are billed separately. That means you pay for what you send to the service and for what you receive back.
You can keep translation costs under control if you:
translate only empty, new, or changed entries,
keep context short and specific (for example: tone, audience, one sentence of guidance),
choose a model that fits the job (fast and inexpensive for standard fields, higher-quality for marketing copy).
What you’ll actually pay depends mainly on the amount of text per target language and the provider/model you choose. Billing always happens directly through the provider, not through BetterLocale Code.
As a rough reference, a typical App Store localization package (title, subtitle, promotional text, description, keywords, “What’s New,” plus a few additional fields) often lands around 10,000 to 15,000 characters per target language. The more context you include, the more additional data is processed each run.
Rough examples per target language
DeepL (character-based)
DeepL’s API pricing is based on characters. With roughly 12,000 characters, you’d be in the ballpark of about $0.30(excluding any base fees), assuming $25 per 1,000,000 characters.
OpenAI (token-based, example: gpt-4.1)
OpenAI bills input and output tokens separately. If you estimate a translation run at 5,000 input tokens + 5,000 output tokens, you end up roughly around $0.05 per language. (Actual token counts vary depending on text length and context.)
Google Gemini (token-based)
Here as well, input and output are billed separately. Using the same 5k/5k estimate, you’re roughly around $0.056 per language.
Claude (Anthropic, token-based, example: Sonnet)
With 5k/5k as a simple guideline, you’re roughly around $0.09 per language.
Perplexity (token-based, Sonar models)
Depending on the model, pricing is in a similar range to Claude Sonnet. With a comparable 5k/5k scenario, you end up in a similar ballpark.
What typically drives costs up in practice
– very long descriptions and lots of extra text (IAP, subscriptions, review notes, custom fields)
– multiple iterations per language (rewriting, shortening, changing tone)
– unnecessary context that gets sent again on every run
Practical tip
For updates, the cheapest approach is usually to translate only missing or changed entries, instead of regenerating every language from scratch each time.
Privacy and Security
BetterLocale Code is designed so your localization data stays on your Mac by default. Project files, language content, and your work-in-progress are not automatically sent to external services, and there is no “silent” background sync.
Network requests happen only when you explicitly trigger them. This mainly applies to AI features such as translation or the built-in chat. If you don’t use these features, BetterLocale Code works fully offline in the sense of “no external requests.”
API keys are not stored in project files. They are stored locally in the macOS Keychain only. That means they are not sitting in plain text somewhere in your file system, and they won’t be accidentally carried along in exports, backups, or project folders.
What gets sent when you use AI features?
When you start an AI feature, BetterLocale Code sends only the data required for that specific request, typically:
a) the selected entries (key–value pairs), or only empty/changed fields depending on your settings
b) the context you provide (for example tone of voice, target audience, additional notes)
c) technical metadata needed for formatting (for example the desired output format)
You decide which entries are translated and whether, for example, only missing translations should be sent. If you have especially sensitive strings, you can exclude them on purpose or handle them manually.
One important note: once you use an external AI provider, that provider’s terms apply. This includes how content is processed, whether and how it is logged, retention periods, and potential transfers to other countries. For legal details, including possible cross-border data transfers, the provider’s privacy policy is the authoritative source.
What’s the difference compared to BetterLocale Apps?
The two apps solve two different localization tasks, which are often handled separately in real-world workflows.
BetterLocale Code is built for localization inside your Xcode project. It’s where you manage the text that actually appears in your app at runtime, such as UI strings, messages, button titles, error text, and more. Technically, BetterLocale Code works with the standard Xcode formats: .xcstrings, .strings, and full .lproj folder structures. The goal is simple: your app shows the right text in every language, and your project stays clean and maintainable.
BetterLocale Apps, on the other hand, focuses on your App Store content. This includes everything you manage in App Store Connect, like the app name, subtitle, promotional text, description, keywords, “What’s New,” URLs, app privacy details, Game Center text, in-app purchases, subscriptions, and other metadata. These texts determine how your app looks in the store and how easily users can find it and they often change per release or per market.
Many developers use both tools together because they complement each other perfectly:
With BetterLocale Code, you keep your in-app strings consistent across languages. With BetterLocale Apps, you keep your App Store metadata clean and up to date in multiple languages without constantly clicking through App Store Connect.
Is BetterLocale Code for indie developers or teams?
BetterLocale Code works well for both solo developers and teams, but the benefits show up in different ways.
For indie developers, it’s primarily a productivity tool. You get all localization files in one place, spot missing translations immediately, and can quickly import, edit, and export changes back into your project. It saves you from jumping between Xcode, folders, and individual files. This is especially helpful when you support many languages or update copy frequently, because it reduces common mistakes and makes releases more reliable.
For teams, BetterLocale Code is also useful if you already have a clear workflow for maintaining localization files and committing them to your repository. That said, the app is not a collaboration or review system. It typically doesn’t provide real-time co-editing with merges, conflict resolution, or in-app roles and approval flows. If multiple people work on the same strings in parallel, coordination should happen through your existing process.
In practice, team workflows tend to work best when you:
a) run localization changes through Git (PRs, reviews, clear ownership)
b) define who creates keys and who maintains translations
c) commit changes in batches per feature or release
d) use exports/backups and clear snapshots when needed, so nothing drifts out of sync
In short: for solo work, it gives you speed and structure. In a team, it fits best when you already rely on Git and reviews and have clear responsibilities.
Legal Notice / Privacy Policy
Provider:
Christian Drapatz
Kämpenstraße 42
45147 Essen
Germany
Contact:
Email: support (at) onetwoapps.com
Phone: +49 (0) 171 7849462 (nur geschäftliche Anfragen)
Web: https://www.onetwoapps.com
Notice
BetterLocale Code is a macOS app and is distributed and sold through the Apple App Store.