
BetterLocale Store
AI-assisted localization for App Store Connect metadata
by Christian Drapatz

App Store Connect localization—clear, organized, and fast.
BetterLocale Store is your macOS tool for App Store Connect text, built around AI from start to finish. You manage your app name, subtitle, description, keywords, and more in a UI that mirrors App Store Connect, just without the chaos. AI helps you translate, rewrite, and keep everything consistent across languages, while also tracking character limits and translation status so nothing gets cut off and no locale falls behind. The result is a faster, cleaner workflow and store copy that reads cohesive in every language.


Available on the Apple App Store
See how you can use AI to translate and maintain your App Store Connect metadata cleanly across multiple languages.
Why BetterLocale Store?
Because App Store copy can make or break performance and this is exactly where the avoidable mistakes happen: an overlong subtitle, keywords over the limit, outdated wording in one language, or three slightly different versions of the same message. BetterLocale Store surfaces these issues before you publish and lets you fix them with targeted AI support, from missing fields and inconsistent terminology to weak phrasing. If you support more than one language or ship updates regularly, this is the difference between “good enough” and an App Store presence that looks professional and is easier to discover.

Have you checked out the “BetterLocale Code” app yet?
BetterLocale Code is your macOS tool for Xcode localization. It lets you manage and convert XCStrings, .strings, and .lproj files in one place, import languages at any time, and keep your translations clean and consistent, even with AI-assisted workflows.
Getting Started
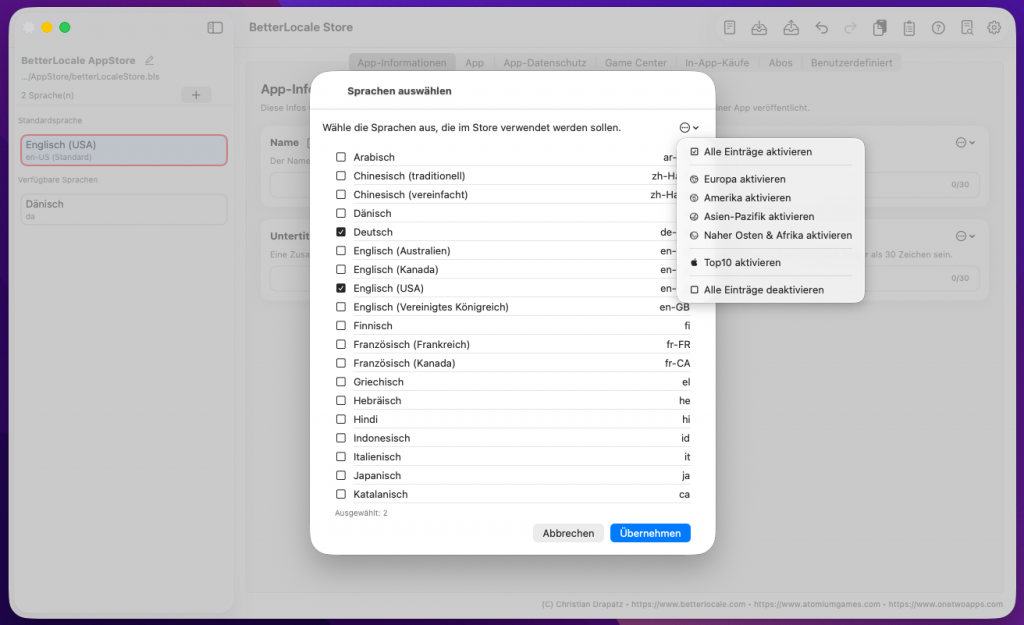
When you start with an empty project, the first step is choosing your languages. This is where you decide which languages you want to maintain for your App Store Connect content, such as the app name, subtitle, description, keywords, “What’s New,” and other fields. The list is based on the languages officially supported by App Store Connect, so you won’t run into surprises later when exporting or syncing.
You can change this selection at any time. You can add languages later as you expand into new markets, and you can remove languages you no longer need. Your existing content generally remains stored with the project, but the app will only show the languages that are currently active. That keeps the interface clean, even as the project grows over time.
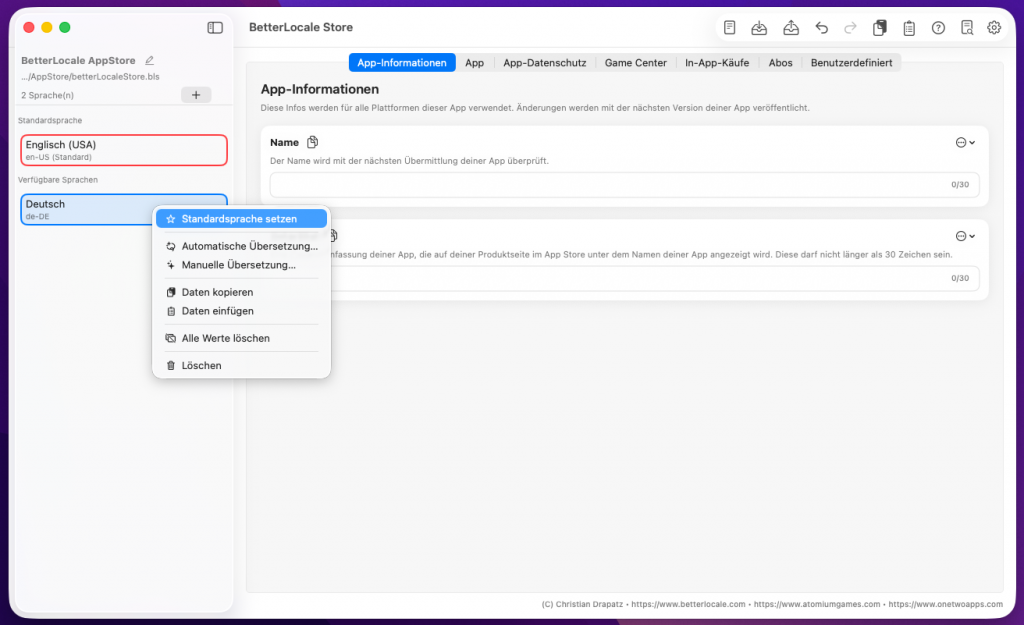
Finally, you set the default language. This is your source language the one you write and maintain first and the reference for translations. In practice, it matters for a few key reasons:
-
Structured translation: New or updated text is translated from the default language into the other languages.
-
Comparison and completeness: It’s easy to spot missing or outdated text in other languages because everything can be checked against the default language.
-
Consistency: The default language becomes your single source of truth, so naming, tone, and terminology stay aligned across all languages.
In short: pick your languages, set a default language, and you have a solid foundation to build, translate, and push your App Store texts to App Store Connect without copy-paste.
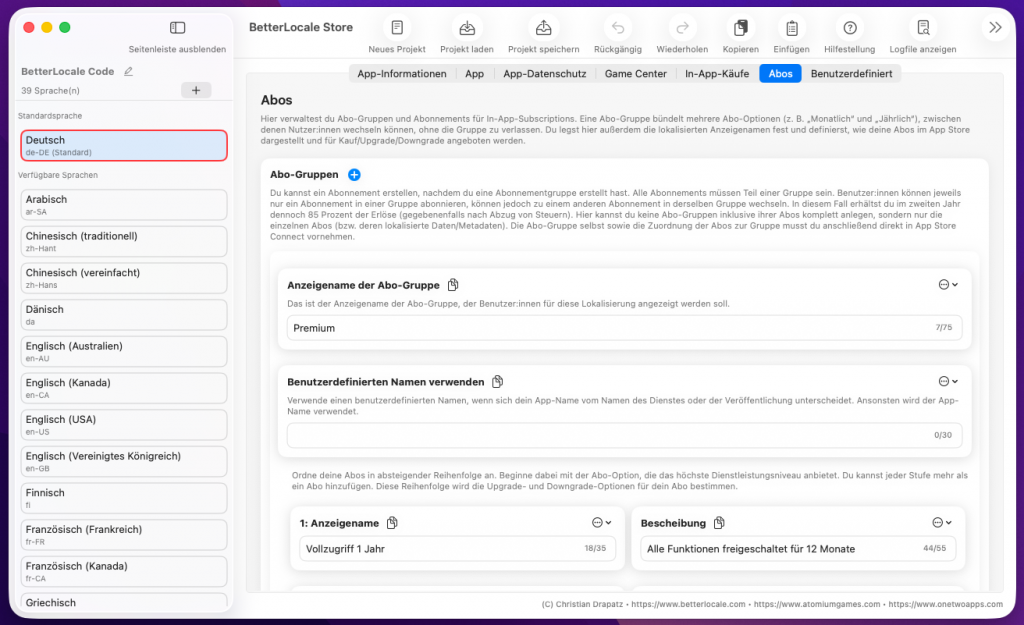
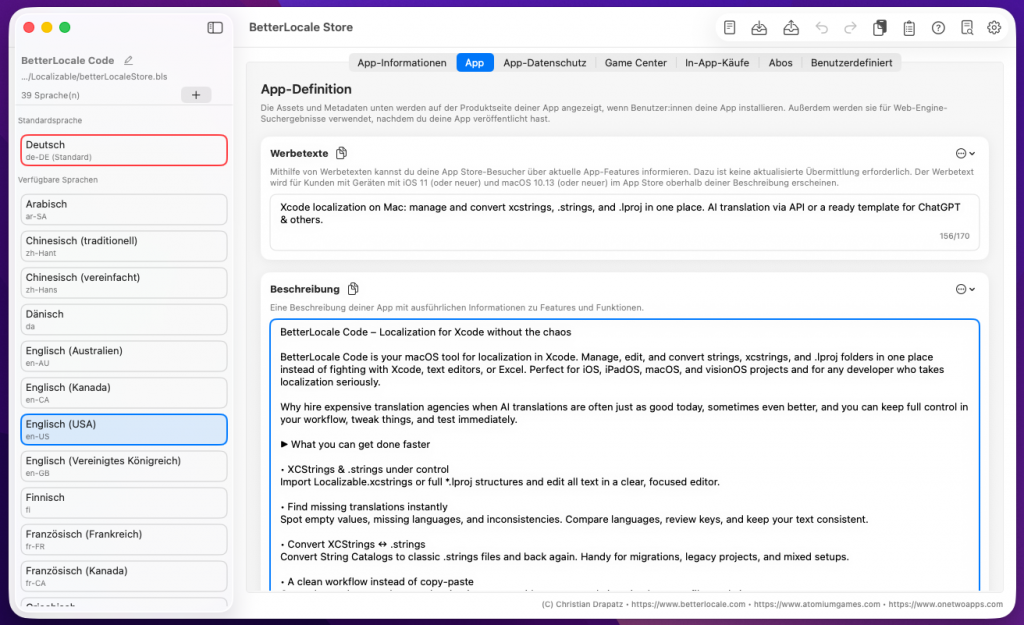
Manage your App Store Connect content directly in BetterLocale Store, using the same structure you already know from App Store Connect. The tab bar lets you quickly jump between sections like App Information, App, App Privacy, Game Center, In-App Purchases, Subscriptions, and a custom page.
In each section, you’ll find the fields exactly as Apple expects them. Every field is clearly labeled and includes a short hint, so you immediately know what belongs there and how the text will be used later. This covers not only name, subtitle, promotional text, description, keywords, and “What’s New,” but also many other details that matter for publishing and maintaining releases, such as support and marketing URLs, market-specific notes, and content related to in-app purchases and subscriptions.
BetterLocale Store helps you catch common mistakes before you upload anything. For every text field, you can see the maximum allowed length. If you exceed it, the field is flagged instantly so you can shorten or rewrite right away, instead of getting blocked later in App Store Connect or during release prep. This saves a lot of time, especially when you’re managing multiple languages, because you fix issues while you write, not at the very end.
On the custom page, you can also collect your own frequently used texts and notes: Apple review templates, recurring standard copy, links, checklists, release notes, or internal reminders. Everything stays in one place, so you don’t have to hunt for these building blocks every time.

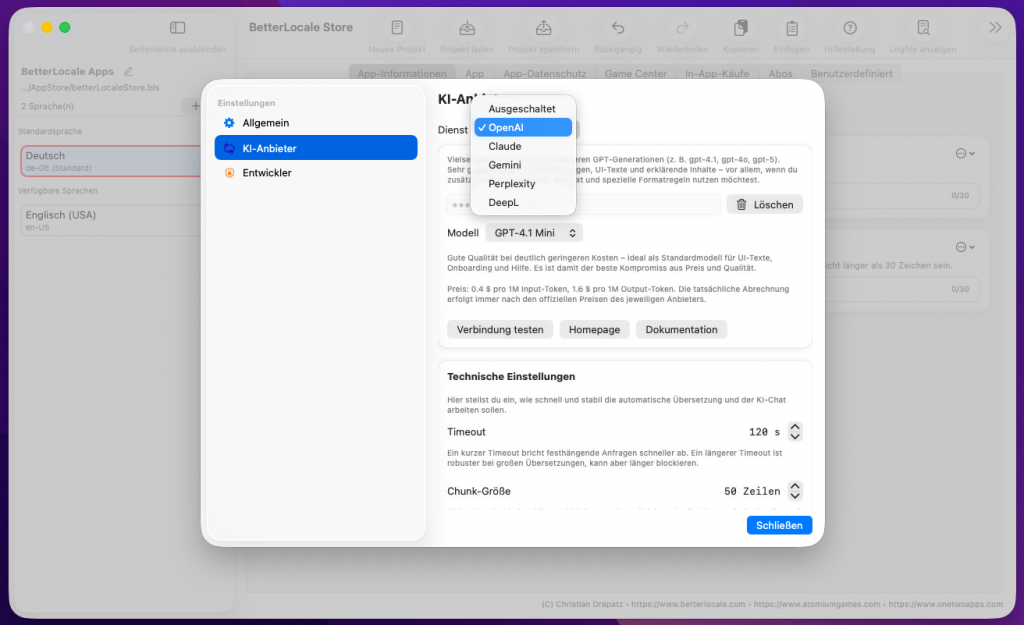
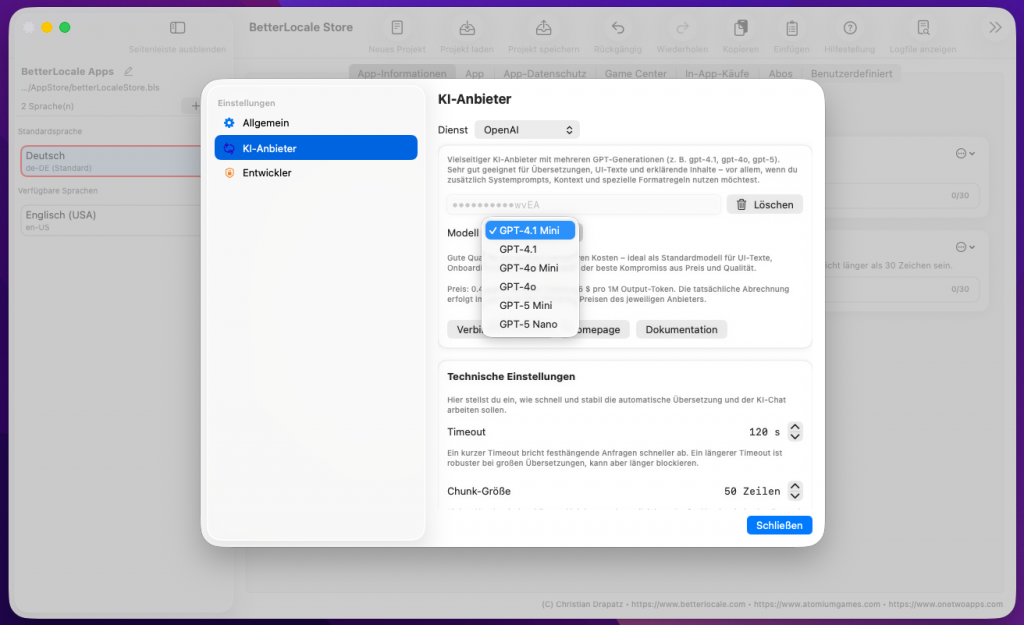
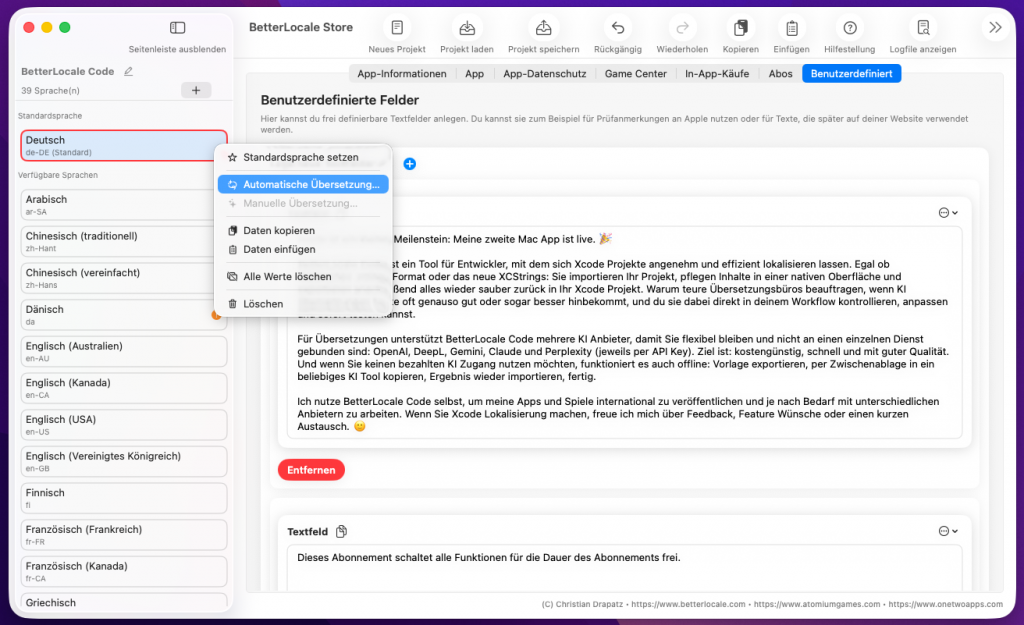
Once all texts are filled in, you can have translations generated automatically right inside BetterLocale Store. The app uses the AI provider you choose. Currently, it supports OpenAI, Google Gemini, Anthropic Claude, Perplexity AI, as well as DeepL
To use this, you’ll need your own account with the respective provider. There you obtain an API token, which enables access to the API and is also used for billing. You enter this token in BetterLocale Store under Settings. It is stored only locally on your Mac and is not shared with us. Before running your first translation, you should use the connection test. This lets you verify the token, endpoint, and network access immediately, without having to start a full translation run.
Costs vary widely depending on the provider, the model you choose, and the amount of text. Many providers charge per “units” (for example, tokens or characters). With ChatGPT and OpenAI, the model typically works like this:
– Your text is broken into tokens (a single word can be split into multiple tokens depending on length and special characters).
– Input (your text plus any context) and output (the generated translation) are billed separately.
So you pay for what you send and for what you receive. If you want predictable costs, it usually helps to translate only the fields that are missing or have changed, and to keep your context prompts short and specific.
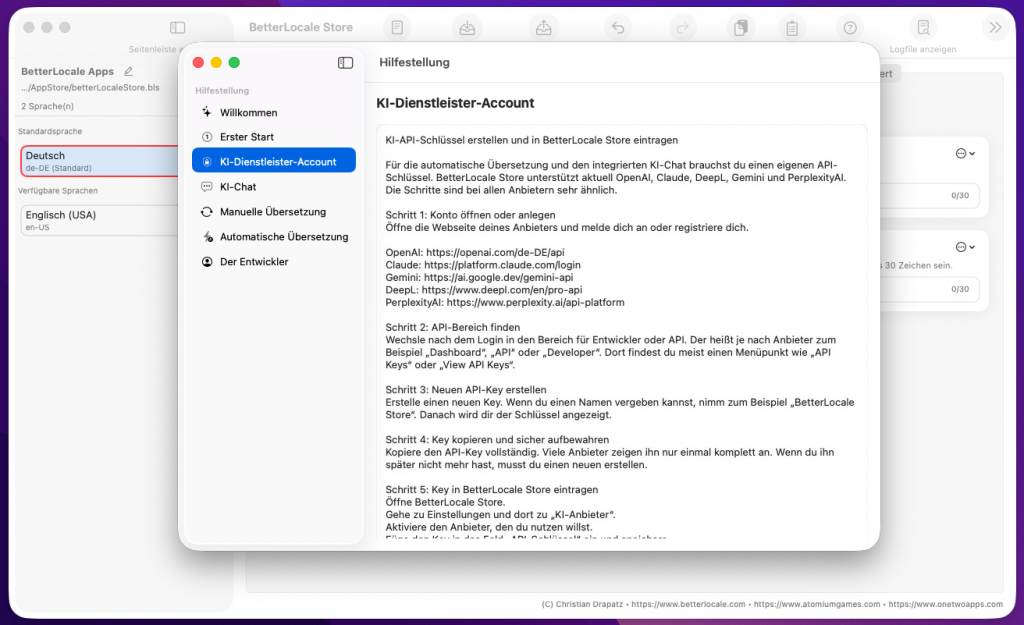
Create an AI API Key and add it to the app
To use automatic translation and the AI chat in the app, you need an API key from an AI provider.
Think of it as a personal access code: the provider uses it to recognize that the request is coming from you, and bills usage through your account.
The app supports multiple AI providers, including OpenAI, Google Gemini, Anthropic Claude, Perplexity AI, as well as DeepL for translations.
Setup is very similar across all providers.
What you should know first
• API key = access code: You enter it in the app so it can send requests to the provider on your behalf.
• Costs are billed to you: The app sends the requests, but billing happens directly through your provider account.
• Billing is often required: Many providers only allow API requests after you add a payment method. Without billing, you’ll often get errors or be stuck in very small free limits.
Quick start: 5 steps to get set up
1. Create an account or sign in
Go to your provider’s website and sign in (or create a new account).
2. Create an API key
Look for a section like API, Developer, Dashboard, or API Keys and create a new key there.
3. Copy the key and store it safely
Copy the key immediately and store it somewhere safe, ideally in a password manager.
Important: many providers show the key in full only once.
4. Enable billing/payment
Add a payment method or enable billing. Otherwise, API requests often won’t work at all or will be heavily limited.
5. Paste the key into the app
Open the app → Settings → AI Providers → select a provider → paste the API key → Save
After that, you can start translations and use the integrated AI chat.
Provider setup (with direct links)
OpenAI (ChatGPT / OpenAI API)
1. Open the OpenAI dashboard:
https://platform.openai.com/
2. Create an API key:
https://platform.openai.com/settings/organization/api-keys
3. Set up billing/payment method:
https://platform.openai.com/settings/organization/billing/payment-methods
Tip: You often see the key in full only once. After that, it may be shown only partially.
Claude (Anthropic)
1. Open the Claude Console:
https://platform.claude.com/
2. In the console, go to Account Settings and create the API key there.
3. Enable billing in the console so you can use the API.
Note: This used to be handled partly via console.anthropic.com; it’s now being migrated/redirected to platform.claude.com.
Gemini (Google)
1. Open Google AI Studio (API Keys):
https://aistudio.google.com/app/apikey
2. If you don’t have a project yet: AI Studio often creates a default project automatically. Otherwise, select/import a Google Cloud project.
3. Create the API key and copy it.
Gemini API key documentation:
https://ai.google.dev/gemini-api/docs/api-key
PerplexityAI
1. Open Account/Settings:
https://www.perplexity.ai/account
2. In Settings, open the </> API tab and generate a key (“Generate API Key”).
3. Alternatively (depending on the UI), use the API portal:
https://www.perplexity.ai/account/api
Optional: API Groups are useful if you want to keep keys separate (for example, “Dev” and “Prod”).
DeepL
1. Open DeepL and sign in:
https://www.deepl.com/
2. Open Account → API Keys & Limits.
3. Click Create key, enter a name, confirm, and copy the key.
DeepL help article:
https://support.deepl.com/hc/en-us/articles/360020695820-API-key-for-DeepL-API
Notes on costs and privacy
• Using AI APIs is usually paid and billed directly through your provider account, typically based on text volume (tokens).
• The app sends only the content you select (for example, the text you want to translate) plus your instruction to the provider.
• Your API key is stored locally on your Mac in the Keychain and is not shared with third parties.
Security
Treat your API key like a password:
• Don’t share it and don’t commit it to public repositories.
• If you think the key is compromised, disable it in the provider dashboard and create a new one.
• If you use multiple devices or projects, it’s best to create a separate key per device/project so you can revoke access selectively without breaking everything.
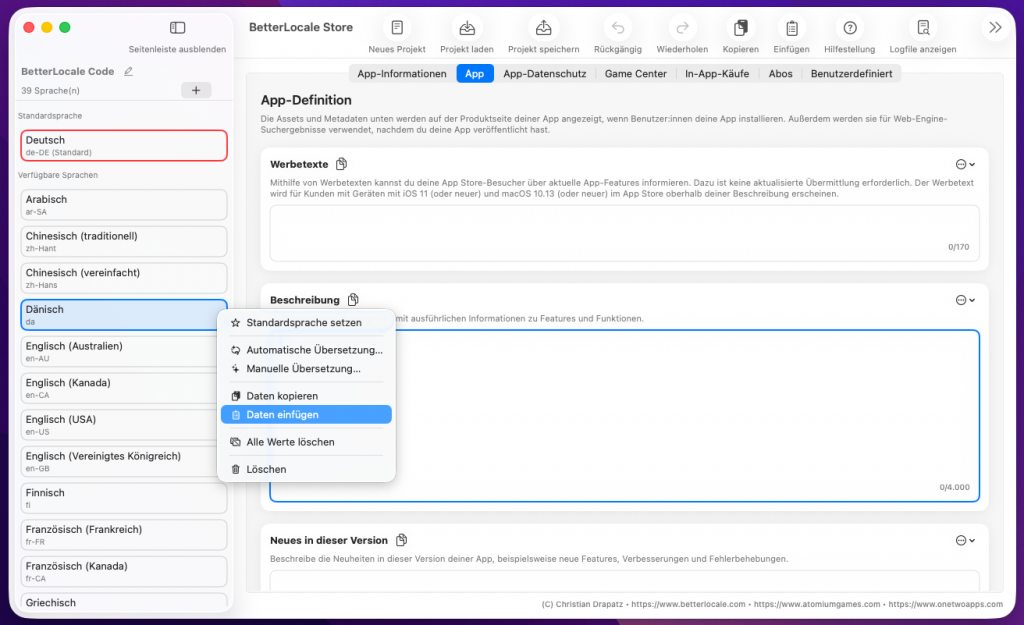
BetterLocale Store gives you two clean ways to translate your App Store Connect text. In both cases, the goal is the same: you don’t “blindly” translate. You provide clear context so tone, audience, and intent match, and you spend less time polishing afterward.
1) Generate a template and translate externally
With this option, BetterLocale Store builds a translation template from the fields you select. Along with the actual text, the template includes context such as the field type (Name, Subtitle, Description, What’s New), the desired tone, and the intended audience. That matters because App Store copy doesn’t behave like regular prose. A subtitle needs to be short and precise, a description can explain and structure, and “What’s New” should be clear and user-focused.
You then copy the template into any external tool you like, such as ChatGPT, Gemini, or DeepL. After you get the translation, you paste the result back into BetterLocale Store. The app recognizes the structure, assigns each translation to the correct language and field automatically, and applies the new text to your project. You can immediately review what changed and fine-tune individual fields without having to hunt everything down again. The key benefit here is maximum flexibility: you can use any tool, even without an API integration, and you keep full control over the prompt and the output.
2) Translate directly in the app (via API)
If you want to move faster, you can run translations directly inside BetterLocale Store. You can still provide context such as tone, audience, and optional notes so the result fits your app. The app sends only the required content to the provider you choose and writes the translations back into the correct fields automatically. Supported providers include OpenAI, Google Gemini, Anthropic Claude, Perplexity AI, as well as DeepL. To use this, you store an API key for the respective service.
One important note: BetterLocale Store does not calculate translation costs for you. Billing happens exclusively through your provider, based on their pricing model. It’s also useful that you can control what gets translated: everything, or only entries that are new, changed, or still empty. That saves time and money, because you’re not re-translating full texts when only a single sentence changed.
Bottom line: the template approach is ideal if you want freedom to use any external tool or like to fine-tune prompts yourself. The API approach is ideal if you want to translate directly in the app, work consistently, and automatically avoid unnecessary repeats.
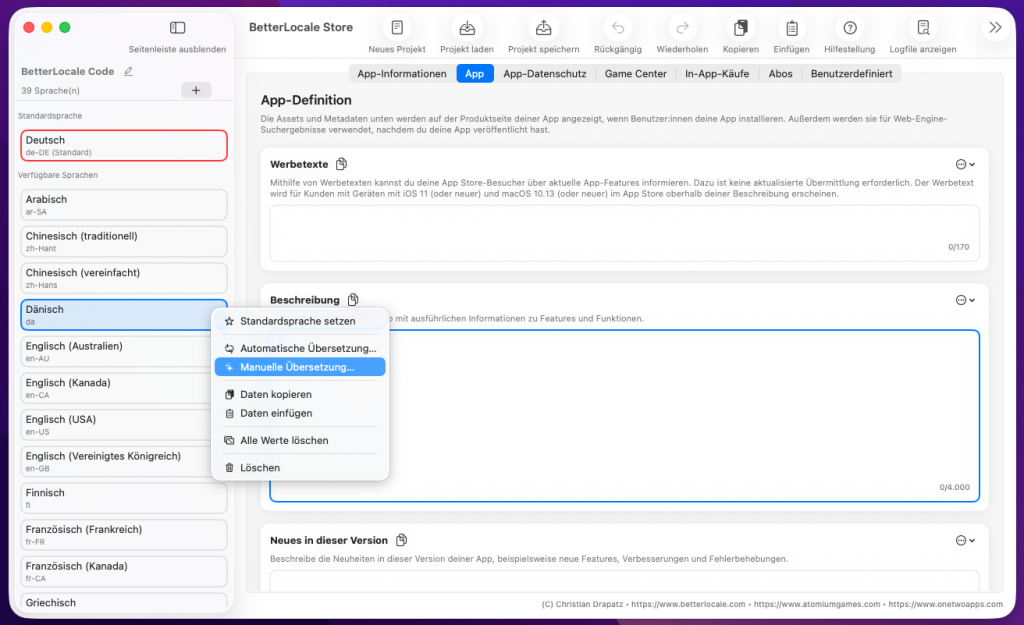
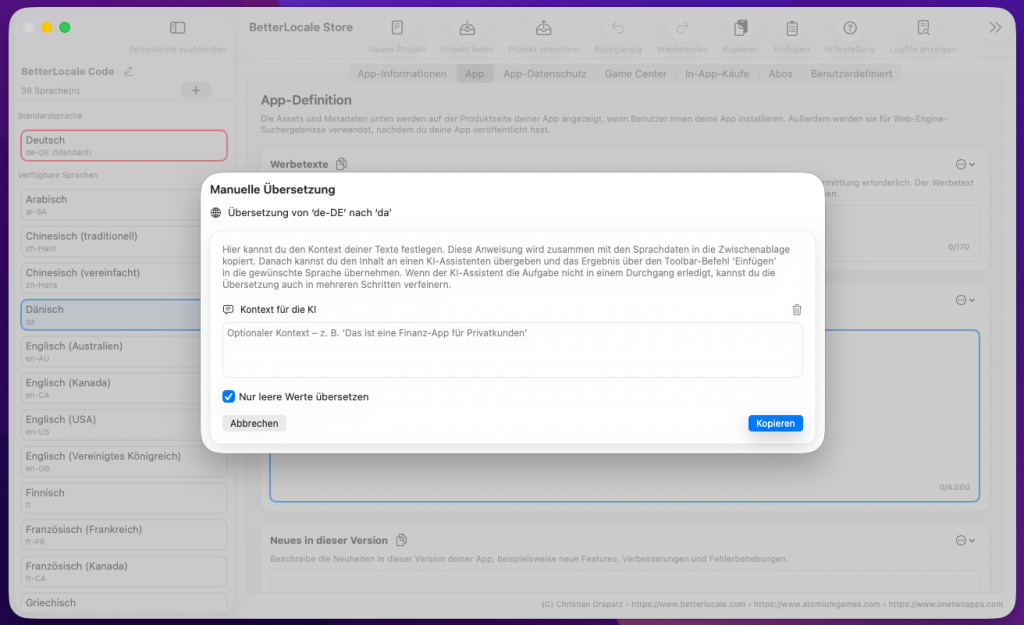
For manual translation, the workflow is intentionally very similar to API translation, just without fetching results directly inside the app. You use the same translation dialog and can optionally provide context, such as tone, target audience, or notes like “UI text, keep it short” or “technical but friendly.” You also choose whether to translate all entries or only empty fields. That’s useful if you already have partial translations and simply want to fill gaps without overwriting existing text.
When you start, BetterLocale Code generates a clean translation instruction and automatically copies it to your clipboard. The instruction includes the selected languages and the relevant key-value pairs in the expected format, so an external tool can work with minimal ambiguity. You then open ChatGPT, DeepL, Gemini, or any other translation tool, paste the instruction, and generate the translations.
The expected output is again a list in the format „Key“ = „Value“; exactly what BetterLocale Code can import. You copy the full output and paste it back into BetterLocale Code. The app reliably matches lines by key, writes the new values into the correct language files, and updates the affected entries in your project right away. This keeps the workflow predictable and transparent even without an API, because you see every step and can fine-tune the result when needed.
If something is off during import, for example missing quotation marks, swapped separators, duplicate keys, an invalid line structure, or extra explanatory text added by the external tool, BetterLocale Code doesn’t fail silently. It highlights the affected entries and shows specific error details, so you can quickly fix the output or run the translation again without accidentally introducing wrong values into your project. The process is a bit more hands-on, but ideal if you don’t want a direct API integration, prefer working across different tools, or want to review translations yourself before importing.

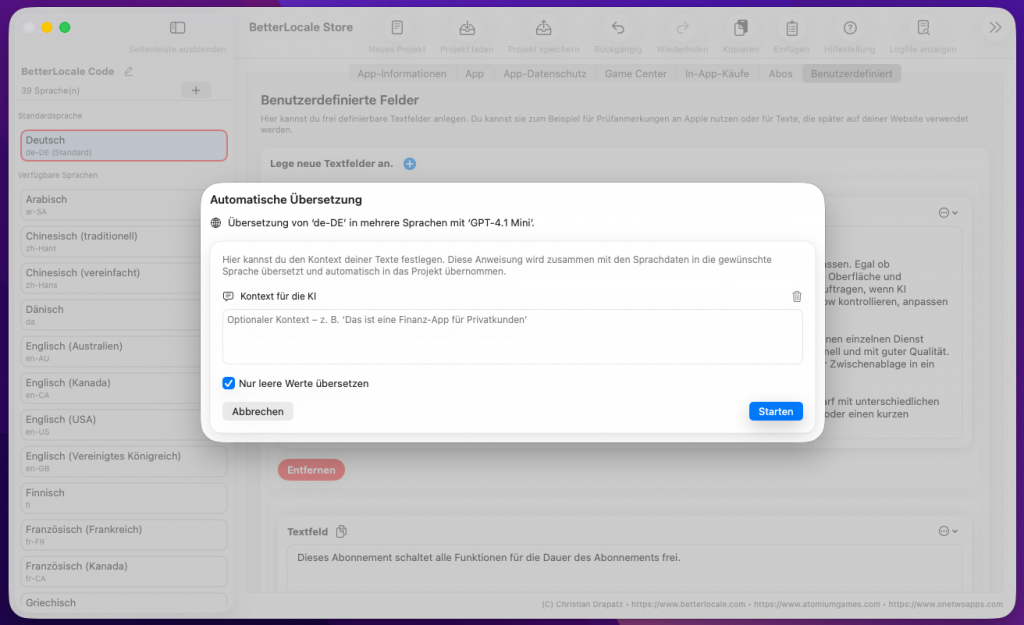
With automatic translation, you can control the scope very flexibly. If you trigger translation from your default language, the app uses it as the source and translates all selected target languages in a single run. This is ideal when you want to fully complete a set of fields or an entire project in one go. Alternatively, you can switch to a specific language view and run translation for that language only. This workflow also works well if you want to launch with two or three core languages first and add additional languages gradually over time.
When you start, a dialog opens where you can optionally provide context. This is often what makes the difference with AI translations: you can specify whether the tone should be formal, casual, or technical, define the target audience (developers, end users, professional readers), and ensure certain terms remain consistent. You can also choose to translate only fields that are currently empty. That’s especially useful if you’ve already refined some texts manually, or if you add new languages later and want to fill gaps without overwriting existing copy.
Once you confirm the dialog, the app starts the translation process. It works field by field and logs what happens. If errors occur, they aren’t simply dismissed. They’re collected and shown at the end in a clear, detailed summary. That way you can immediately tell whether there was a network issue, a provider rejected a request, or specific fields couldn’t be processed for other reasons.
You can rerun the process at any time. A common pattern is to translate everything as a first pass, refine a few texts in the default language later, and then run translation again, this time only for missing or still-empty entries. This keeps the workflow controlled and lets you iterate without having to redo everything each time.
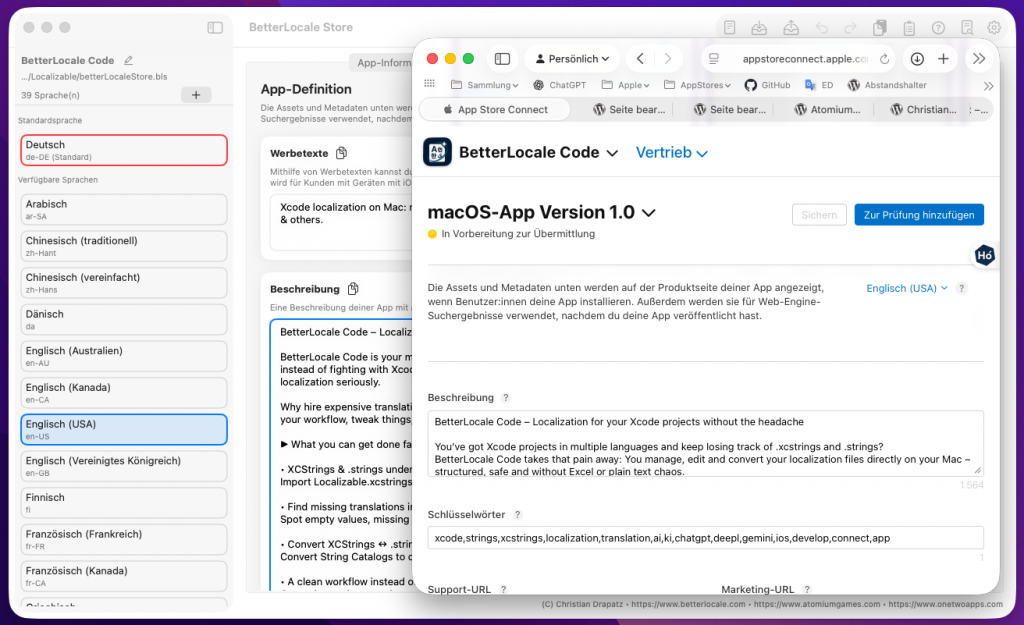
Once you’re done polishing and translating in BetterLocale Store, the final step is intentionally “classic”: you manually transfer the finished text into App Store Connect. In practice, that means going language by language, opening the relevant sections in App Store Connect (App Information, Version Information, and optionally In-App Purchases, depending on what you manage), and entering the content field by field. It may feel a bit old-school at first, but it comes with a major benefit: you keep full control of the final state inside App Store Connect at all times, and you can immediately see what’s actually planned to go live, including Apple’s versioning, submission, and review UI.
The real value happens before that. BetterLocale Store surfaces the usual pitfalls while you’re writing, where they’re cheapest to fix. Many App Store fields have strict limits and “invisible” rules: subtitles and promotional text can exceed the limit quickly, keywords must fit into a tight character cap and vary widely by language, and descriptions often pick up duplicates, special characters, or formatting that later looks messy. When the app flags these issues as you work, you can shape your text from the start so it fits App Store Connect without rework. That saves the annoying loop where you only discover at paste-time that Apple truncates something or the field simply won’t accept it.
It also makes the handoff calmer. Because you maintain everything centrally and clearly structured per language, you’re no longer copy-pasting from five different sources. No Excel fragments, no scattered notes, no “latest version” buried in a chat or an old ticket. For each language, the final text lives in one place. That dramatically reduces common mistakes: mixed-up language variants, broken line breaks, accidentally using outdated promotional text, or keywords with the wrong separators. If you ship to many countries or release updates frequently, this becomes a real quality lever. Releases stay predictable, and you’re less likely to be scrambling right before submission.
In the end, manual entry in App Store Connect is no longer the moment where you discover problems. It’s simply the last step to bring already reviewed, finalized content into Apple’s system.
Additional Features
BetterLocale Store includes a built-in tutorial that guides you through the most important areas right inside the app. It doesn’t just show you where things are, it also explains what a typical real-world workflow looks like. That way you can get productive quickly without having to read a long manual or piece the UI together on your own.
The tutorial follows the workflow most people use when working with App Store Connect text: you create a project, define your target languages, and then maintain content such as the name, subtitle, description, keywords, “What’s New,” and other fields. Along the way, it shows you how to edit fields efficiently, how to track completion status per language, and how to avoid common mistakes like truncated text, missed languages, or inconsistent wording across markets.
A key focus is AI-powered translation. The tutorial covers both common approaches: using a generated template and working manually via the clipboard, so you can paste results from the tool of your choice, or translating directly inside the app via an API if you’ve configured a supported provider and API key. It also explains how to provide context and tone so translations don’t feel overly literal, and how to quickly review what’s still missing or incomplete afterward.
What’s especially practical is that the tutorial isn’t a one-time walkthrough. You can restart it anytime, skip steps, and use it as a quick guide when you haven’t used the app in a while or when new features arrive in an update. It’s designed to be an everyday reference, not just a first-launch assistant.

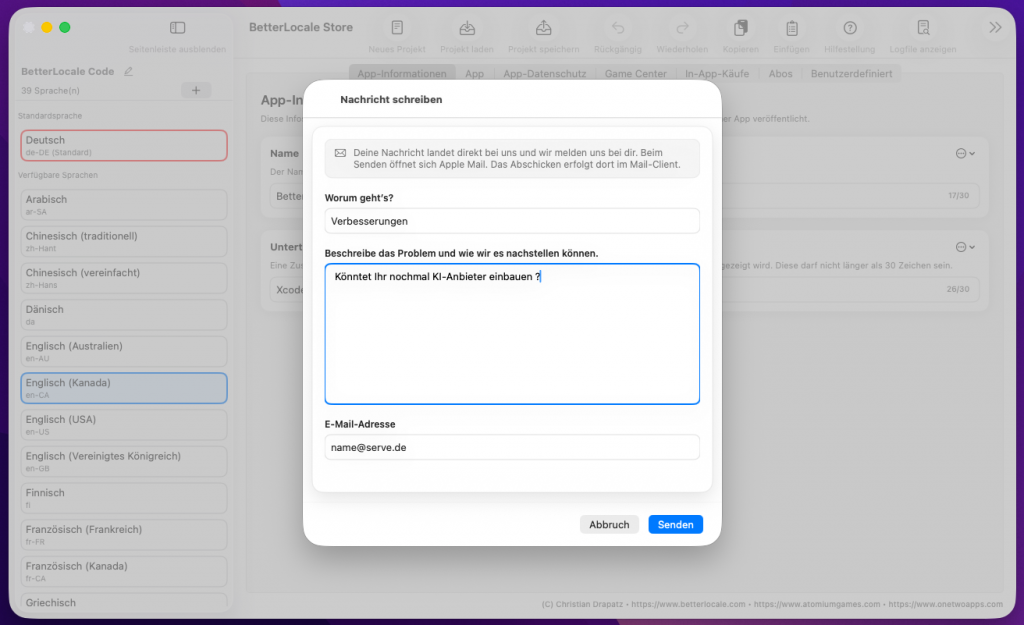
BetterLocale Store makes it easy to send feedback directly from within the app, without having to gather details first. When you choose the Feedback command, the app opens your default email client and automatically creates a new message with a prefilled subject line. You can start writing right away, whether it’s a quick question, a feature request, or a bug report.
The benefit is that it removes the usual back-and-forth. You don’t have to look up which app version you’re on, where the issue occurred, or what you were doing at the time. Just describe what happened in a few sentences and send the email. If you want, you can add extra details such as steps to reproduce, what you expected, and what happened instead. That way your feedback reaches us quickly and clearly, and we can respond more precisely, avoid follow-up questions, and reproduce issues faster.
Important: BetterLocale Store does not send emails in the background. It simply opens your email app and prepares a draft. You stay in full control of what gets sent and when you send it.

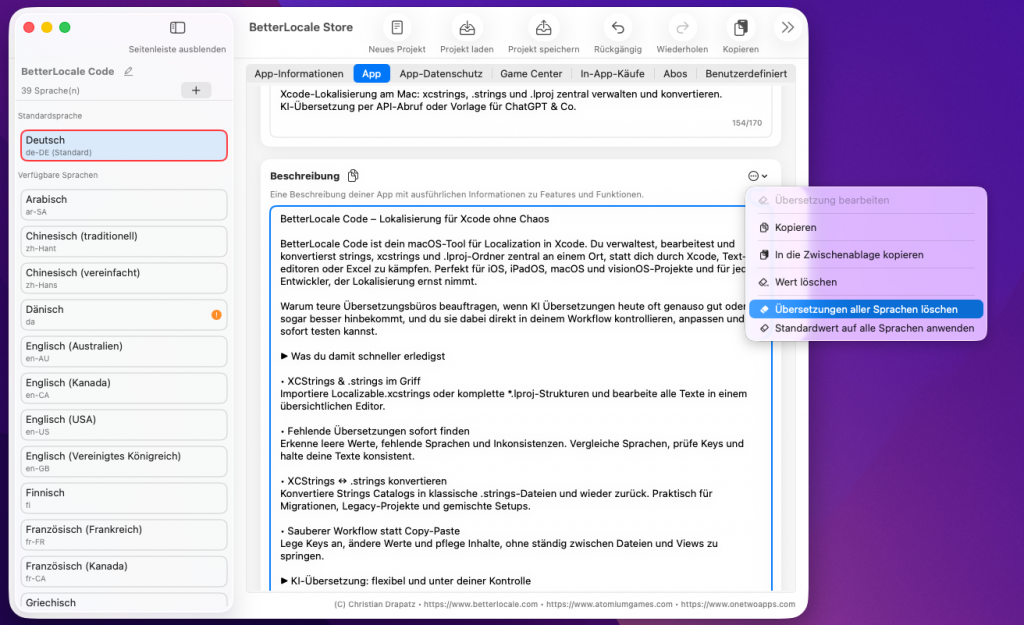
When you change a text in the default language, it’s effectively a new source string. Existing translations may still be “formally correct,” but semantically wrong, because they refer to an older wording or the nuance no longer matches. That’s why it can be better to discard translations in other languages and regenerate them, rather than silently keeping outdated values. BetterLocale Store detects these changes and automatically alerts you, so you don’t accidentally ship stale translations in a release.
You can also trigger this step manually at any time: select the entry in the default language and choose “Delete translations for all languages.” After that, the fields in other languages are empty or clearly marked as missing, and you immediately see what needs to be retranslated. This is especially useful when revising copy, updating legal notices, polishing marketing phrasing, or changing the tone of voice. In those cases, keeping “old” translations usually isn’t what you want, because they may no longer match the current meaning and style.
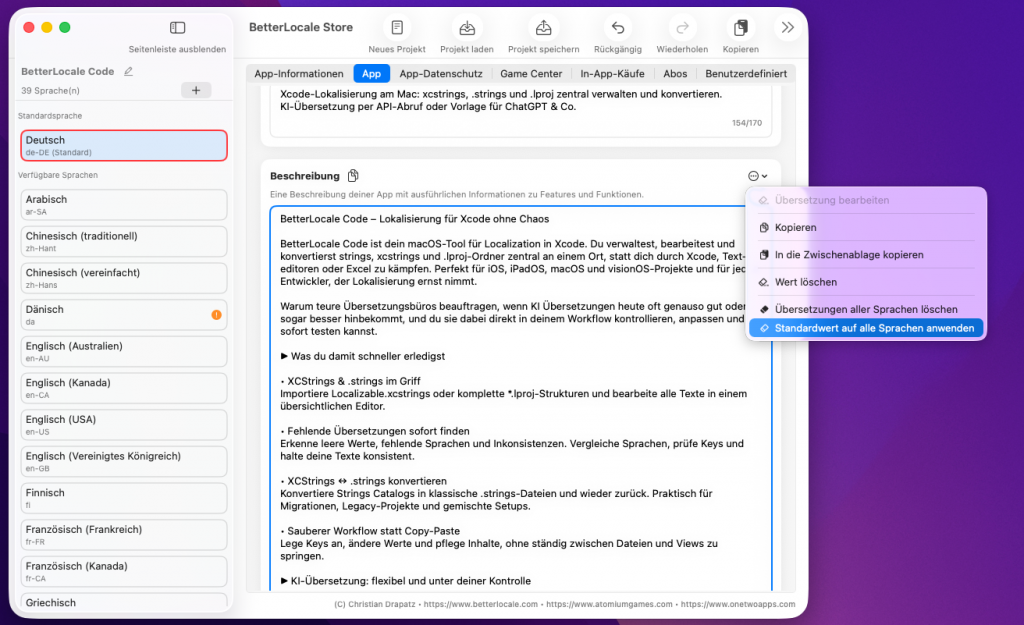
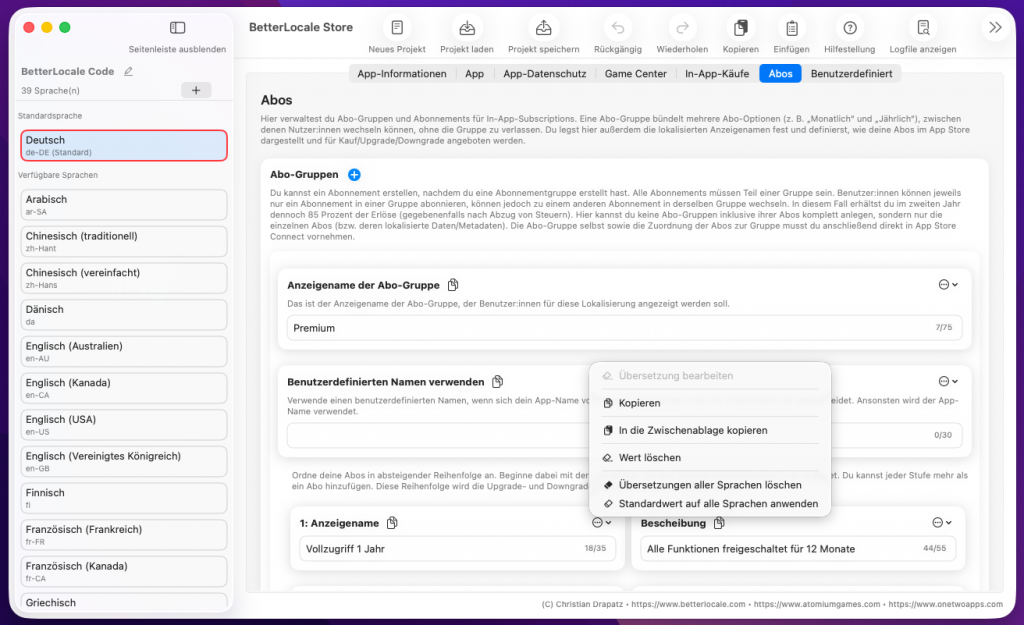
On the other hand, some content is intentionally identical across all languages. Typical examples include URLs, product names, brand names, and sometimes short technical terms or fixed spellings. For that, use “Apply default value to all languages.” BetterLocale Store copies the default-language value into every other language without you having to touch each one individually. This keeps everything consistent, saves time, and prevents an accidental mismatch, like a different link or a slightly altered spelling.
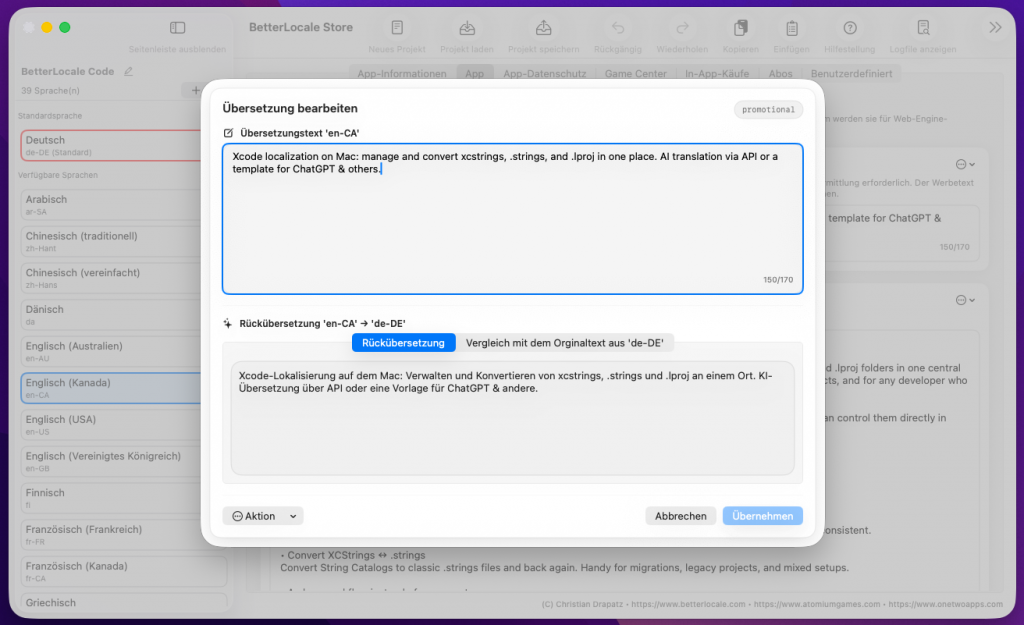
Once translations are available, you can quickly spot-check quality with a small sample. Select an entry and start “Edit Translations.” A dialog opens that clearly shows three pieces of information side by side (or in separate sections): the translation in your selected target language, the original text in your base language, and a back-translation into the base language. The back-translation isn’t a “second proof of truth,” but it’s extremely useful for catching meaning drift, missing context, the wrong tone, or overlooked details (for example negations, verb tenses, domain terms) without requiring you to be fluent in the target language.
In the same dialog, you can intervene immediately if needed. You can correct translations, refine phrasing, enforce consistent terminology, and verify that placeholders, variables, and special formatting were carried over correctly. Especially for App Store text or UI strings, it’s also worth a quick check of length and readability: Does the style match the rest of the product? Is the message clear? And does the translation stay faithful to the original without sounding unnatural? When you make changes, you see the result right away in the context of that entry and can iterate until it feels right.
This gives you a reliable sense of translation quality with minimal effort, and lets you fix critical spots quickly before you finalize or publish the text.
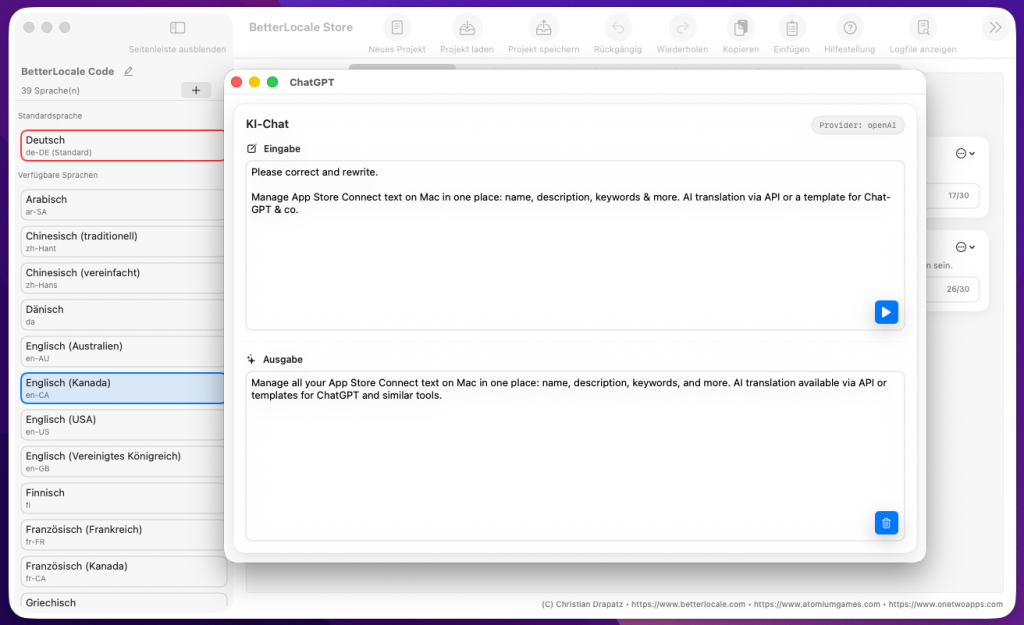
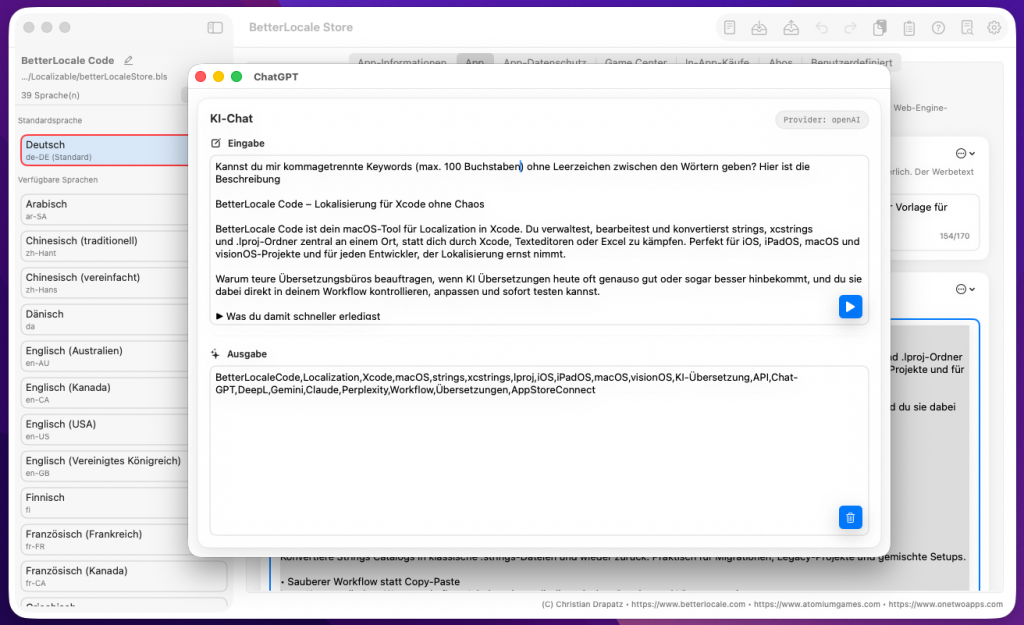
BetterLocale Store also includes an integrated AI chat that feels familiar if you’ve used ChatGPT: you type naturally, get responses in a running thread, can ask follow-up questions, have text rewritten, or request multiple variations. This is especially handy for App Store Connect content. For example, you can generate a subtitle in a specific tone, sanity-check keywords, review a translation for naturalness, or ask why a phrasing sounds off in a target language. Technically, this isn’t a separate “chat channel” it uses the same connected AI APIs as the translation features. That means the same model and provider settings you selected in the app apply here as well.
Billing always happens with the respective provider and depends on the model and actual usage. With OpenAI, for example, usage is billed in tokens, separately for input and output. As a rough reference, OpenAI lists the following rates for GPT-4.1 (per 1M tokens): $2.00 for input, $0.50 for cached input, and $8.00 for output. “Cached input” applies when part of your prompt can be reused from a prompt cache, which can reduce input costs and often happens automatically.
Have you tried OneTwoApps’ iPhone and iPad apps yet?
ScanBox
My Budget Book

My Budget Book Pro
Pricing / Premium
BetterLocale Store is offered as a subscription so we can maintain the app long-term, keep it stable, and continue improving it consistently. Your subscription supports regular updates, bug fixes, and quality improvements that you’ll actually notice in day-to-day use.
A key part of this is expanding the AI features, including gradually adding support for additional providers over time. While your subscription is active, you automatically get access to all new features and optimizations we release.
The subscription includes the full feature set. You can subscribe directly in the app and cancel anytime through the App Store. You can also open the relevant App Store subscription page from within the app.
Full Access (1 Month)
All features unlocked for 1 month.
That’s €3.99 per month.
Full Access (2 Months)
All features unlocked for 2 months.
That’s about €3.5 per month.
Full Access (3 Months)
All features unlocked for 3 months.
That’s about €3.3 per month.
Full Access (6 Months)
All features unlocked for 6 months.
That’s about €2.8 per month.
Full Access (12 Months)
All features unlocked for 12 months.
That’s about €2.1 per month.
App Privacy
BetterLocale Store stores projects and language data exclusively locally on your Mac. Data is only transmitted externally if you optionally use AI features (for example, translation or chat). In that case, only the content you selected, together with the specific request, is sent to the AI provider you choose. API keys are stored locally in the macOS Keychain only.
For more details, please see the full Privacy Policy.
Have you checked out AtomiumGames’ games yet?


Crazy Monsters

Tower Arena: Time for heroes

Strategy War: Battle Game

Battle Alliance: Tower Defense
FAQ
Hier sind die häufigsten Fragen, die beim Arbeiten mit App-Store-Lokalisierungen auftauchen. Wenn du danach noch was offen hast, sag einfach Bescheid.
Do I need App Store Connect credentials in the app?
No. BetterLocale Store does not require App Store Connect credentials and does not connect to App Store Connect directly. Everything happens inside the app: you maintain all relevant metadata in the familiar App Store field structure, add languages, check completeness, and edit texts centrally per language.
For translations, you have two options. You can generate a translation template, translate externally, and paste the result back in, or you can use direct translation via API. In both cases, no Apple login is required. For the API option, you only need the API key from your AI provider.
Once everything is ready, you manually transfer the content to App Store Connect. The advantage is that you keep full control over the final upload while still preparing, reviewing, and organizing all texts cleanly and consistently beforehand.
Can I use BetterLocale Store without an AI subscription?
Yes. You can use BetterLocale Store fully without a direct AI integration. In that case, the app generates a translation template for you. The template contains the content to be translated in a clear, structured format and can optionally include additional context, such as the desired tone, target audience, or style guidelines.
You then copy the template into any external tool, such as ChatGPT (web), Gemini, or another translation service. After translating, you’ll get an output in the expected format, which you paste back into BetterLocale Store. The app recognizes the content, automatically assigns it to the correct fields and languages, and applies the translations.
This is especially useful if you don’t want to store API keys, if you already rely on a browser-based AI workflow, or if you prefer to review translations manually and translate only selected fields.
Which AI providers are supported?
Depending on your setup, BetterLocale Store can work with different AI services. Currently, it supports providers such as OpenAI, Google Gemini, Anthropic Claude, Perplexity AI, as well as DeepL. You choose which provider you want to use and store the corresponding API key in the app.
In practice, that means you’re not locked into a single service. If one provider performs better for certain languages or types of text, or if you want to compare cost, speed, and writing style, you can switch accordingly. The translation features and the built-in AI chat use the same integration, so you can use your chosen provider not only for translations, but also for follow-up questions, wording checks, or generating alternative versions.
Important: Billing is always handled by the provider under their own pricing model. BetterLocale Store does not sell tokens or usage bundles. It simply uses your API key to make requests.
Where is my API key stored?
Your API key is stored locally in the macOS Keychain. That means it isn’t kept in plain text in project files, configuration folders, or anywhere else on disk where it could accidentally end up in backups, Git repositories, or log files. When needed, BetterLocale Store retrieves the key from the Keychain to send requests to the AI provider you’ve selected.
Your key is not transmitted to us and is never stored on our servers. It stays on your Mac and can be managed centrally there, just like in other apps that store credentials or tokens securely.
If you want to change or remove the key, you can do so either in the app or directly in the Keychain using Apple’s “Keychain Access” app on macOS.
What does AI translation realistically cost?
It mainly depends on two things: how much text you translate per language, and which provider or model you use. Billing always happens directly with the provider, not through BetterLocale Store.
To give you a realistic feel, here’s a practical example: a typical App Store localization (title, subtitle, promotional text, description, keywords, “What’s New,” plus a few extra fields) often lands around 10,000–15,000 characters per language. If you include extra context (tone, audience, notes), there’s a bit of additional overhead.
Examples (rough estimates, per target language)
DeepL (character-based)
• DeepL API Free: up to 500,000 characters/month free.
• DeepL API Pro: monthly base fee + usage-based costs, e.g. $25 per 1,000,000 characters.
Example math: 12,000 characters ≈ 12,000 / 1,000,000 × $25 ≈ $0.30 for that language (excluding the monthly base fee).
OpenAI (token-based, example: GPT-4.1)
OpenAI bills input and output tokens separately (for GPT-4.1, for example $2 / 1M input and $8 / 1M output).
If you estimate a run at roughly 5,000 input tokens + 5,000 output tokens, you get:
0.005×$2 + 0.005×$8 ≈ $0.05 per language. (Just an example. Real token counts vary.)
Google Gemini (token-based, paid tier, prompts ≤ 200k)
Gemini lists pricing like $1.25 / 1M input and $10 / 1M output (output includes “thinking tokens”) for prompts up to 200k tokens.
Using the same 5k/5k example: 0.005×$1.25 + 0.005×$10 ≈ $0.056 per language.
Claude (Anthropic, token-based, example: Sonnet)
Claude Sonnet is listed at about $3 / 1M input and $15 / 1M output.
Example 5k/5k: 0.005×$3 + 0.005×$15 ≈ $0.09 per language.
Perplexity (Sonar models, token-based)
Perplexity’s docs list Sonar Pro at $3 / 1M input and $15 / 1M output, and depending on the mode there can also be request fees.
That puts it in a similar range to Claude Sonnet, depending on how much text you send and how many requests are involved.
What actually drives costs up in real life?
• Very long descriptions and lots of extra texts (IAP, subscriptions, review notes, custom fields)
• Many iterations (“rewrite it,” “make it shorter,” “change tone”)
• Too much repeated context in the prompt that gets sent every time
Practical tip to keep costs low
Use the option to translate only empty/changed entries instead of re-translating everything each time. For updates, that’s usually the biggest savings.
Can I translate only specific fields instead of everything?
In BetterLocale Store, translation is controlled by language scope, not by individual fields. You can either translate all target languages in one run, or select a single language and translate only that one.
You can also choose whether the translation should cover all entries or only fill in empty ones. This is especially useful when you add a new language or just want to backfill missing text. Existing content remains unchanged.
What types of text is the tool best suited for?
BetterLocale Store is ideal for any content you maintain per language in App Store Connect and typically revisit for each release. This includes the core App Store fields such as the app name, subtitle, promotional text, description, “What’s New” (release notes), and keywords, as well as many other fields that are easy to overlook in day-to-day work, like support and marketing URLs, country-specific notes, and additional metadata.
The tool is also especially strong for areas that usually involve a lot of detail work: App Privacy information, Game Center, and all text related to in-app purchases and subscriptions. Because BetterLocale Store organizes everything in a clean structure that mirrors App Store Connect, you can maintain each language consistently, review changes faster, and keep your wording aligned across locales.
This becomes particularly valuable if you support many countries or languages, or ship frequent updates: you can immediately see which languages are complete, which fields are missing, and where content should be retranslated after changes to your default language.
How do I prevent translations from sounding “too literal”?
The biggest lever is context. When you translate, be as clear as possible about how the text should feel and who it’s written for. In BetterLocale Store, you can provide guidance such as tone (for example: casual, neutral, technical, marketing), target audience (for example: developers, end users, gamers), and optionally sample phrasing or preferred wording. The more specific these inputs are, the more likely you’ll get a translation that reads naturally and fits your app, instead of sticking to the source text word for word.
If you translate externally, you can include the same context directly in the generated template. That way your translation tool gets the same guardrails, even when the translation doesn’t happen inside the app. Afterward, it’s worth doing quick spot checks, especially for high-impact fields like the title, subtitle, promotional text, and keywords.
If you translate via API, it also helps to run a short connection test first, so you know the selected provider, your API key, and the chosen model are working correctly before starting larger batches.
Cost matters too: charges are billed by the AI provider, not by BetterLocale Store. Pricing is usage-based, typically driven by text volume and tokens.
Is BetterLocale Store better for indie developers or teams?
BetterLocale Store is primarily designed for solo developers and small setups where one person owns the App Store text and drives localization. In that scenario, the benefit is biggest: all fields and languages live in one place, you can prepare translations cleanly, and then manually transfer the final content to App Store Connect.
It can still be useful for teams, as long as you have a clear internal owner who is responsible for the final metadata. What’s important to know is that there’s no built-in versioning or collaboration layer. That means no parallel editing by multiple people, no change merging, no conflict resolution, and no roles or approval workflows. If several people work on the same copy at the same time, you’ll need to handle that organizationally, for example with clear ownership, structured handoffs, or additional tools outside the app.
If you’re working as a team and want changes to remain traceable, it’s a good idea to add a lightweight process, such as regular exports/backups with timestamps, storing them in a shared repository, or defining a single source of truth so different versions don’t drift apart.
What’s the difference from BetterLocale Code?
The two apps solve two different localization tasks that are usually handled separately in real-world workflows.
BetterLocale Code is built for localization inside your Xcode project. It manages the text that shows up in the app itself: UI strings, messages, button labels, error messages, and more. Technically, BetterLocale Code works with the standard Xcode formats such as .xcstrings, .strings, and full .lproj structures. The goal is simple: your app displays the correct text at runtime in every language, and your project stays clean and maintainable.
BetterLocale Store, on the other hand, focuses on your App Store content. This includes everything you manage in App Store Connect, like the app name, subtitle, promotional text, description, keywords, “What’s New,” URLs, app privacy text, Game Center, in-app purchases, subscriptions, and other metadata. These texts control how your app looks in the store and how easily users can find it, and they often change by release or market.
Many developers use both tools together because they complement each other perfectly:
With BetterLocale Code, you keep your in-app text consistent across the project. With BetterLocale Store, you keep your App Store metadata clean across multiple languages without constantly clicking around in App Store Connect.
Legal Notice / Privacy Policy
Provider:
Christian Drapatz
Kämpenstraße 42
45147 Essen
Germany
Contact:
Email: support (at) onetwoapps.com
Phone: +49 (0) 171 7849462 (nur geschäftliche Anfragen)
Web: https://www.onetwoapps.com
Notice
BetterLocale Code is a macOS app and is distributed and sold through the Apple App Store.